7-Day Automated Email Marketing
7-Day Automated Email Marketing
v1.0.3
zhanpeiwei
Quickly set up a 7-day automated email sequence to guide new users, onboard customers, and run product launch or welcome campaigns. Perfect for SaaS email marketing, automated follow-up emails, and continuous engagement to improve user activation, retention, and early product adoption.
📣 Marketing
💼 Sales
🤖 Automation
Included Resources
New Users
Email Series Automation
Interrupt Sequence Delay Automation
Workflow Graph
Workflow Graph
Workflow of 7-Day Automated Email Marketing
Release notes
Release notes
Release notes of 7-Day Automated Email Marketing
7-Day Automated Email Marketing
In SaaS businesses, the conversion from user registration to activation is a critical stage. Timely and personalized email interactions can significantly enhance user activation and retention rates. This template is designed to guide users through a series of carefully crafted marketing emails over the crucial first 7 days after registration, encouraging early engagement and satisfaction with your product.
- Customer Interaction Journey: On days 1 through 7 after a user registers, the system will send customized emails. If the user does not respond to the previous email, the system will automatically send the next email based on preset rules, continuing the conversion process for 3 consecutive days.
- Once a user replies to an email, the system will automatically recognize this and pause subsequent email sends. For example, if a user replies on day 2, the email scheduled for day 3 will be canceled. This interruption mechanism not only enhances the authenticity of interactions but also effectively avoids excessive disturbances. You can also set a button in the email for users to opt-out of receiving further emails. This setting will be detailed in the usage steps.
By using the "7-Day Automated Email Marketing" template, you can more effectively guide new users in understanding and using your product, improving activation and retention rates, thus driving business growth. Additionally, by analyzing email open and click rates, you can optimize email content and sending strategies, enhancing marketing effectiveness.
👉 How the Template Works
This template is designed to enhance user experience and reduce early churn, covering the following two core functions:
- New Users: This database stores all new user information and email addresses. It supports manual entry, form submissions, and Excel imports, and can integrate with your platform via API to automatically import user information without manual operations.
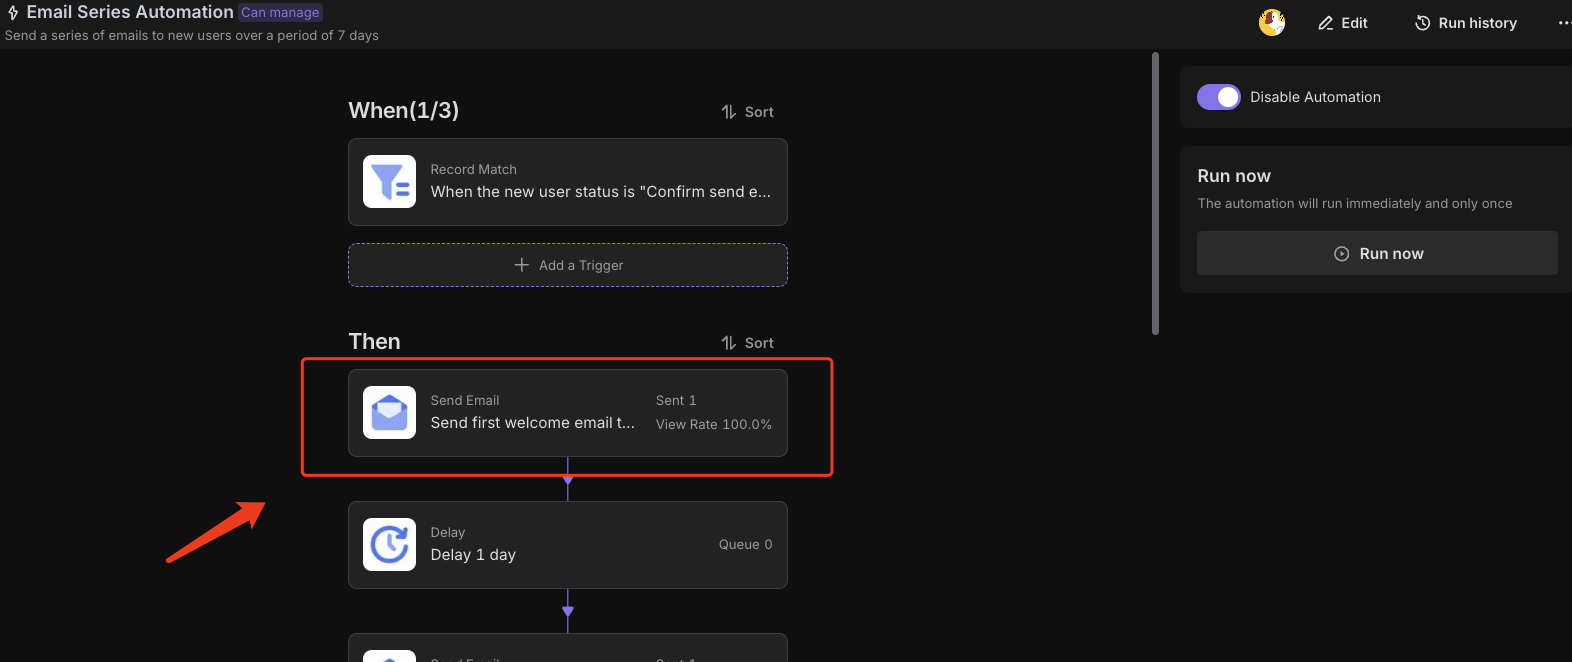
- Email Series Automation: When a user's status is updated to "Confirm Send Email," this automation will automatically initiate, sending a preset marketing email every day for 7 days to guide users in familiarizing themselves with product features and usage processes.
- Interruption Sequence Delay Automation: When a user replies to an email, the system automatically identifies this and interrupts subsequent delayed emails to avoid unnecessary disturbances.
🎯 Steps to Use
1. Install the Template
Log in to the Bika platform and install the "7-Day Automated Email Marketing."
2. Complete Initialization Tasks
Go to the "Email Series Automation" node. Click through each email sending step to access the configuration page. If your space already has SMTP configuration integrated, select the integrated email; if not, click "Create New Integration." For details, refer to the user manual.
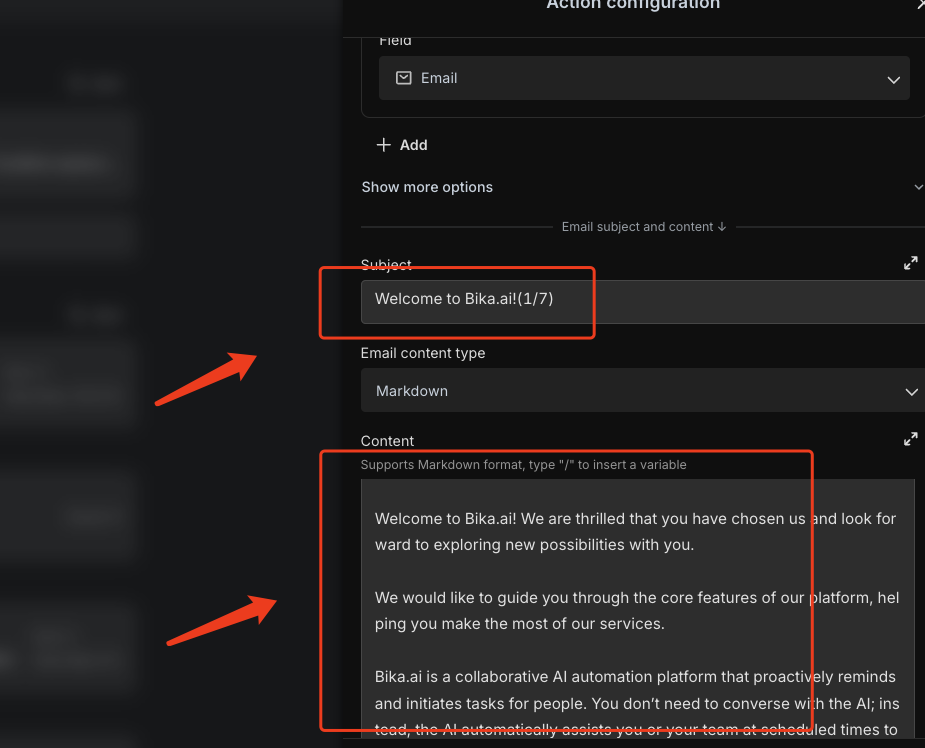
3. Customize Email Content
Review and adjust the email content based on product characteristics and user needs, ensuring alignment with your brand style and effectively guiding users through key activation steps.
Next, we will introduce the design details regarding the interruption delay part. If you choose Method 1, you can directly use the template, only needing to modify your email body content.
Method 1: Automatically Cancel Subsequent Delayed Emails When Users Reply
- Design Logic (only need to understand the logic; the template can be used directly): Each email will include a unique identifier (automation run ID). When users reply, they will include this ID, and the system will identify the automation process and stop sending subsequent emails. Note: For this method, the sender and recipient must be the same email.
- Format Requirements:
- Email Type: HTML
- Email Body: Set both the email background and the automation run ID background color to white to visually hide the ID. For example:
- Format Requirements:
<style>
      body {
         background-color: white;
      }
      .hidden-content {
         color: white;
      }
</style>
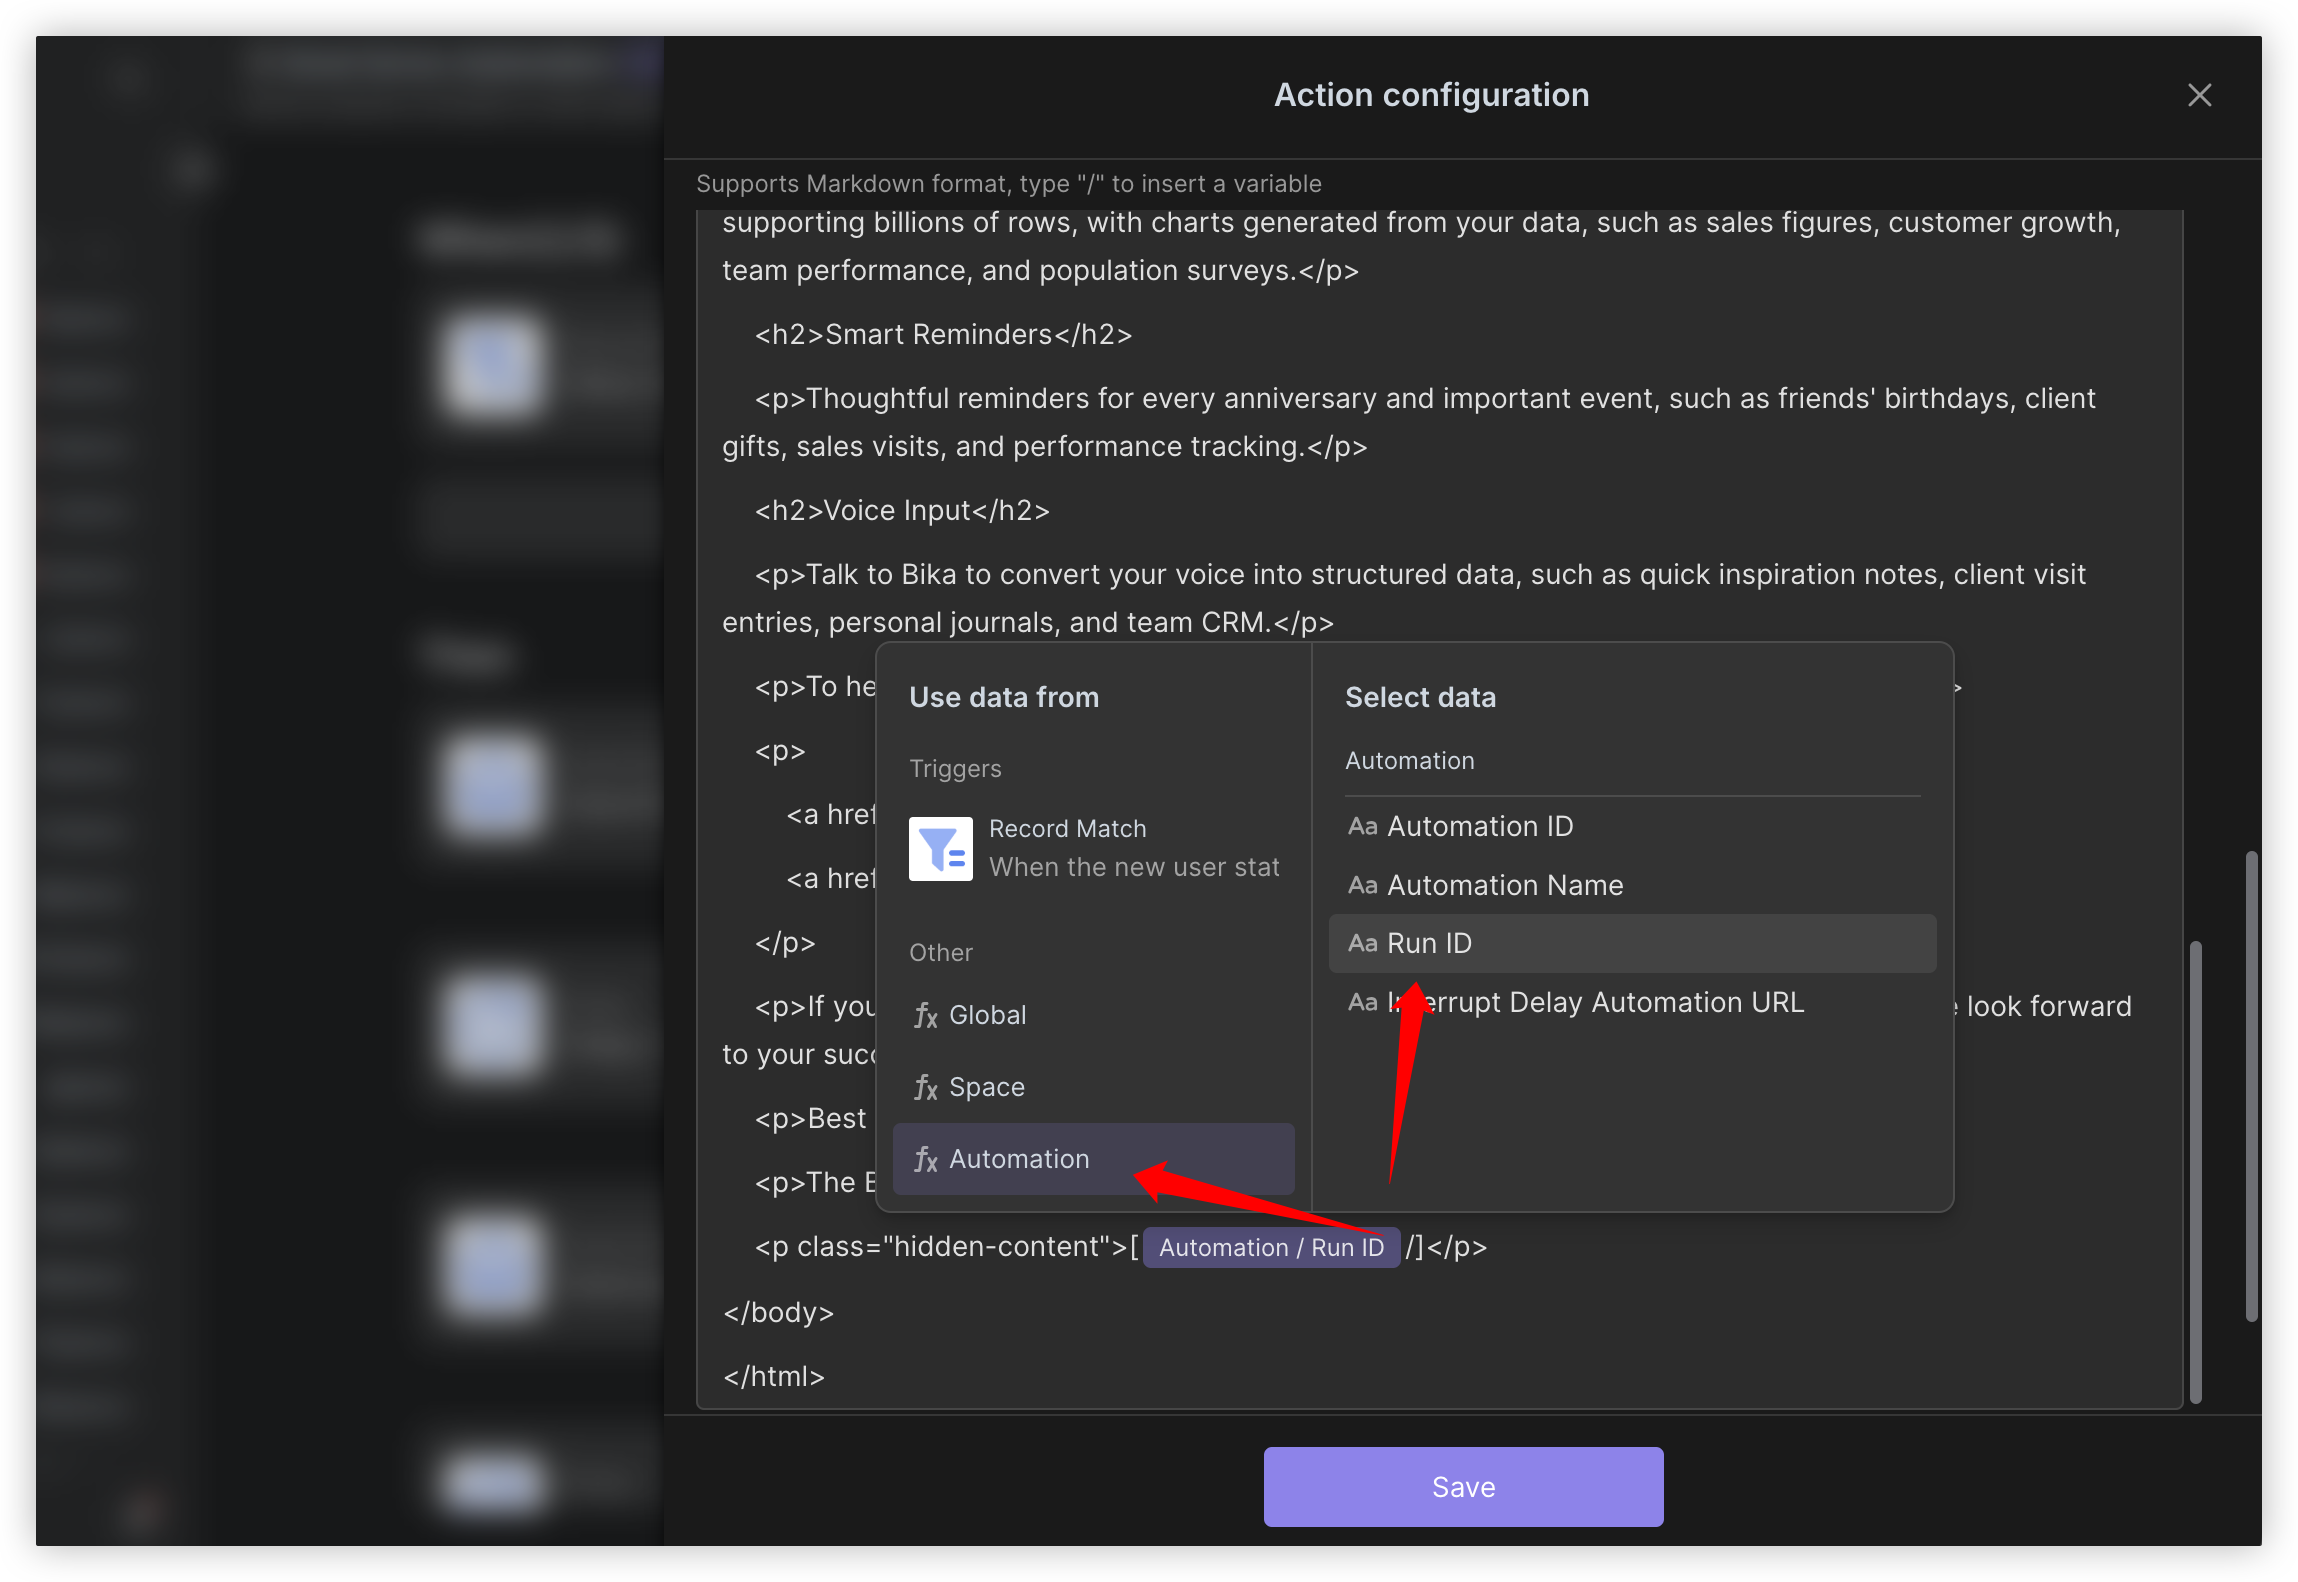
<p class="hidden-content">[<%= _automation.runHistoryId %>]</p>
- The
<%= _automation.runHistoryId %>is the automation run ID variable. Use the English "/" to call the variable option, inserting: Other - Automation - Automation Run ID. Refer to the screenshot for guidance.
Method 2: Set Up a Manual Button for Users to Cancel Subsequent Delayed Emails
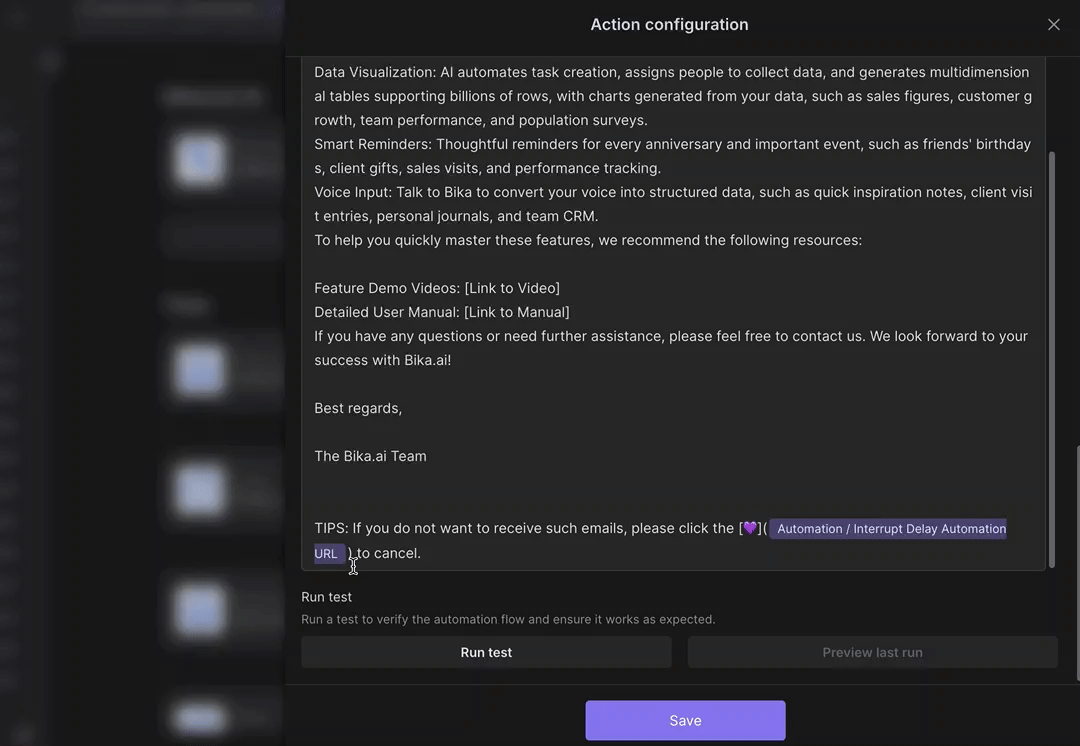
If you choose this method, you do not need to configure the "Interruption Sequence Delay Automation." Just include a button in your email body that links to cancel the automated delay, for example, in markdown format:
- Email Type: Markdown
- Email Body: Add a prompt like, "If you do not want to receive such emails, please click 💜 to cancel." The link needs to call the variable for inserting: Other - Automation - Interrupt Delay Cancel Automation URL. Refer to the screenshot for guidance.
4. Configure "Interruption Delay Sequence Automation"
-
Configure Email IMAP Go to the "Interruption Sequence Delay Automation" configuration page. If your space has an IMAP email configuration integrated, select the integrated email; if not, click "Create New Integration." For details, refer to the user manual.
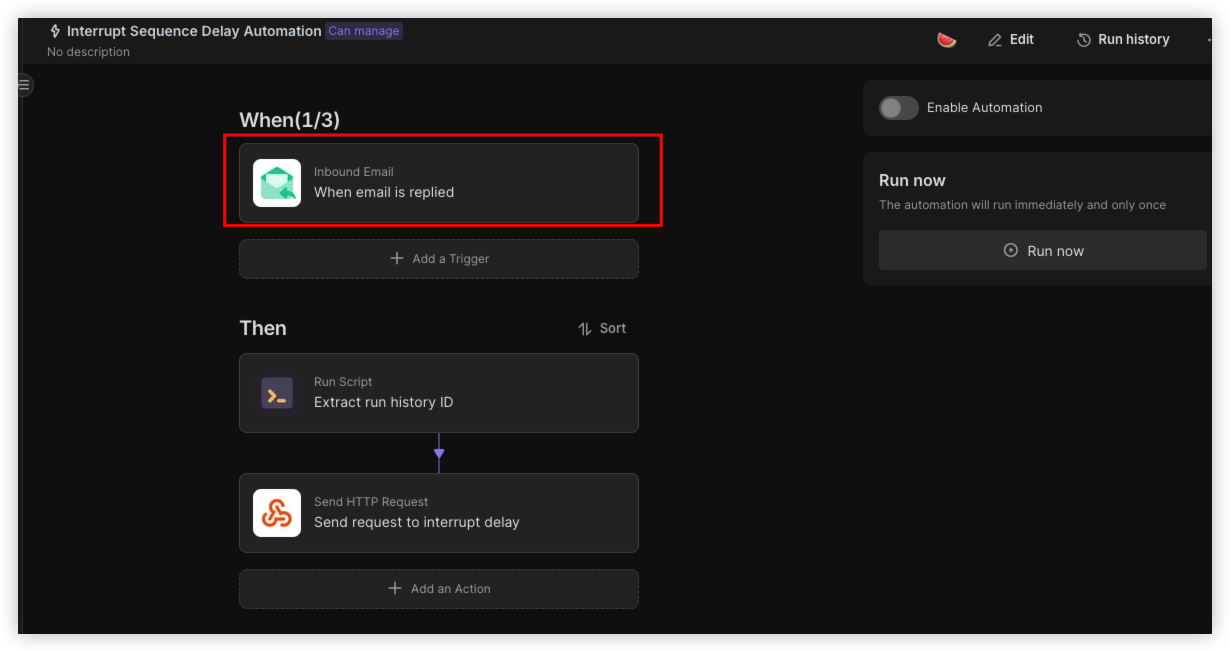
-
Run Script This part extracts the automation run ID variable from the email body; no modifications are needed.
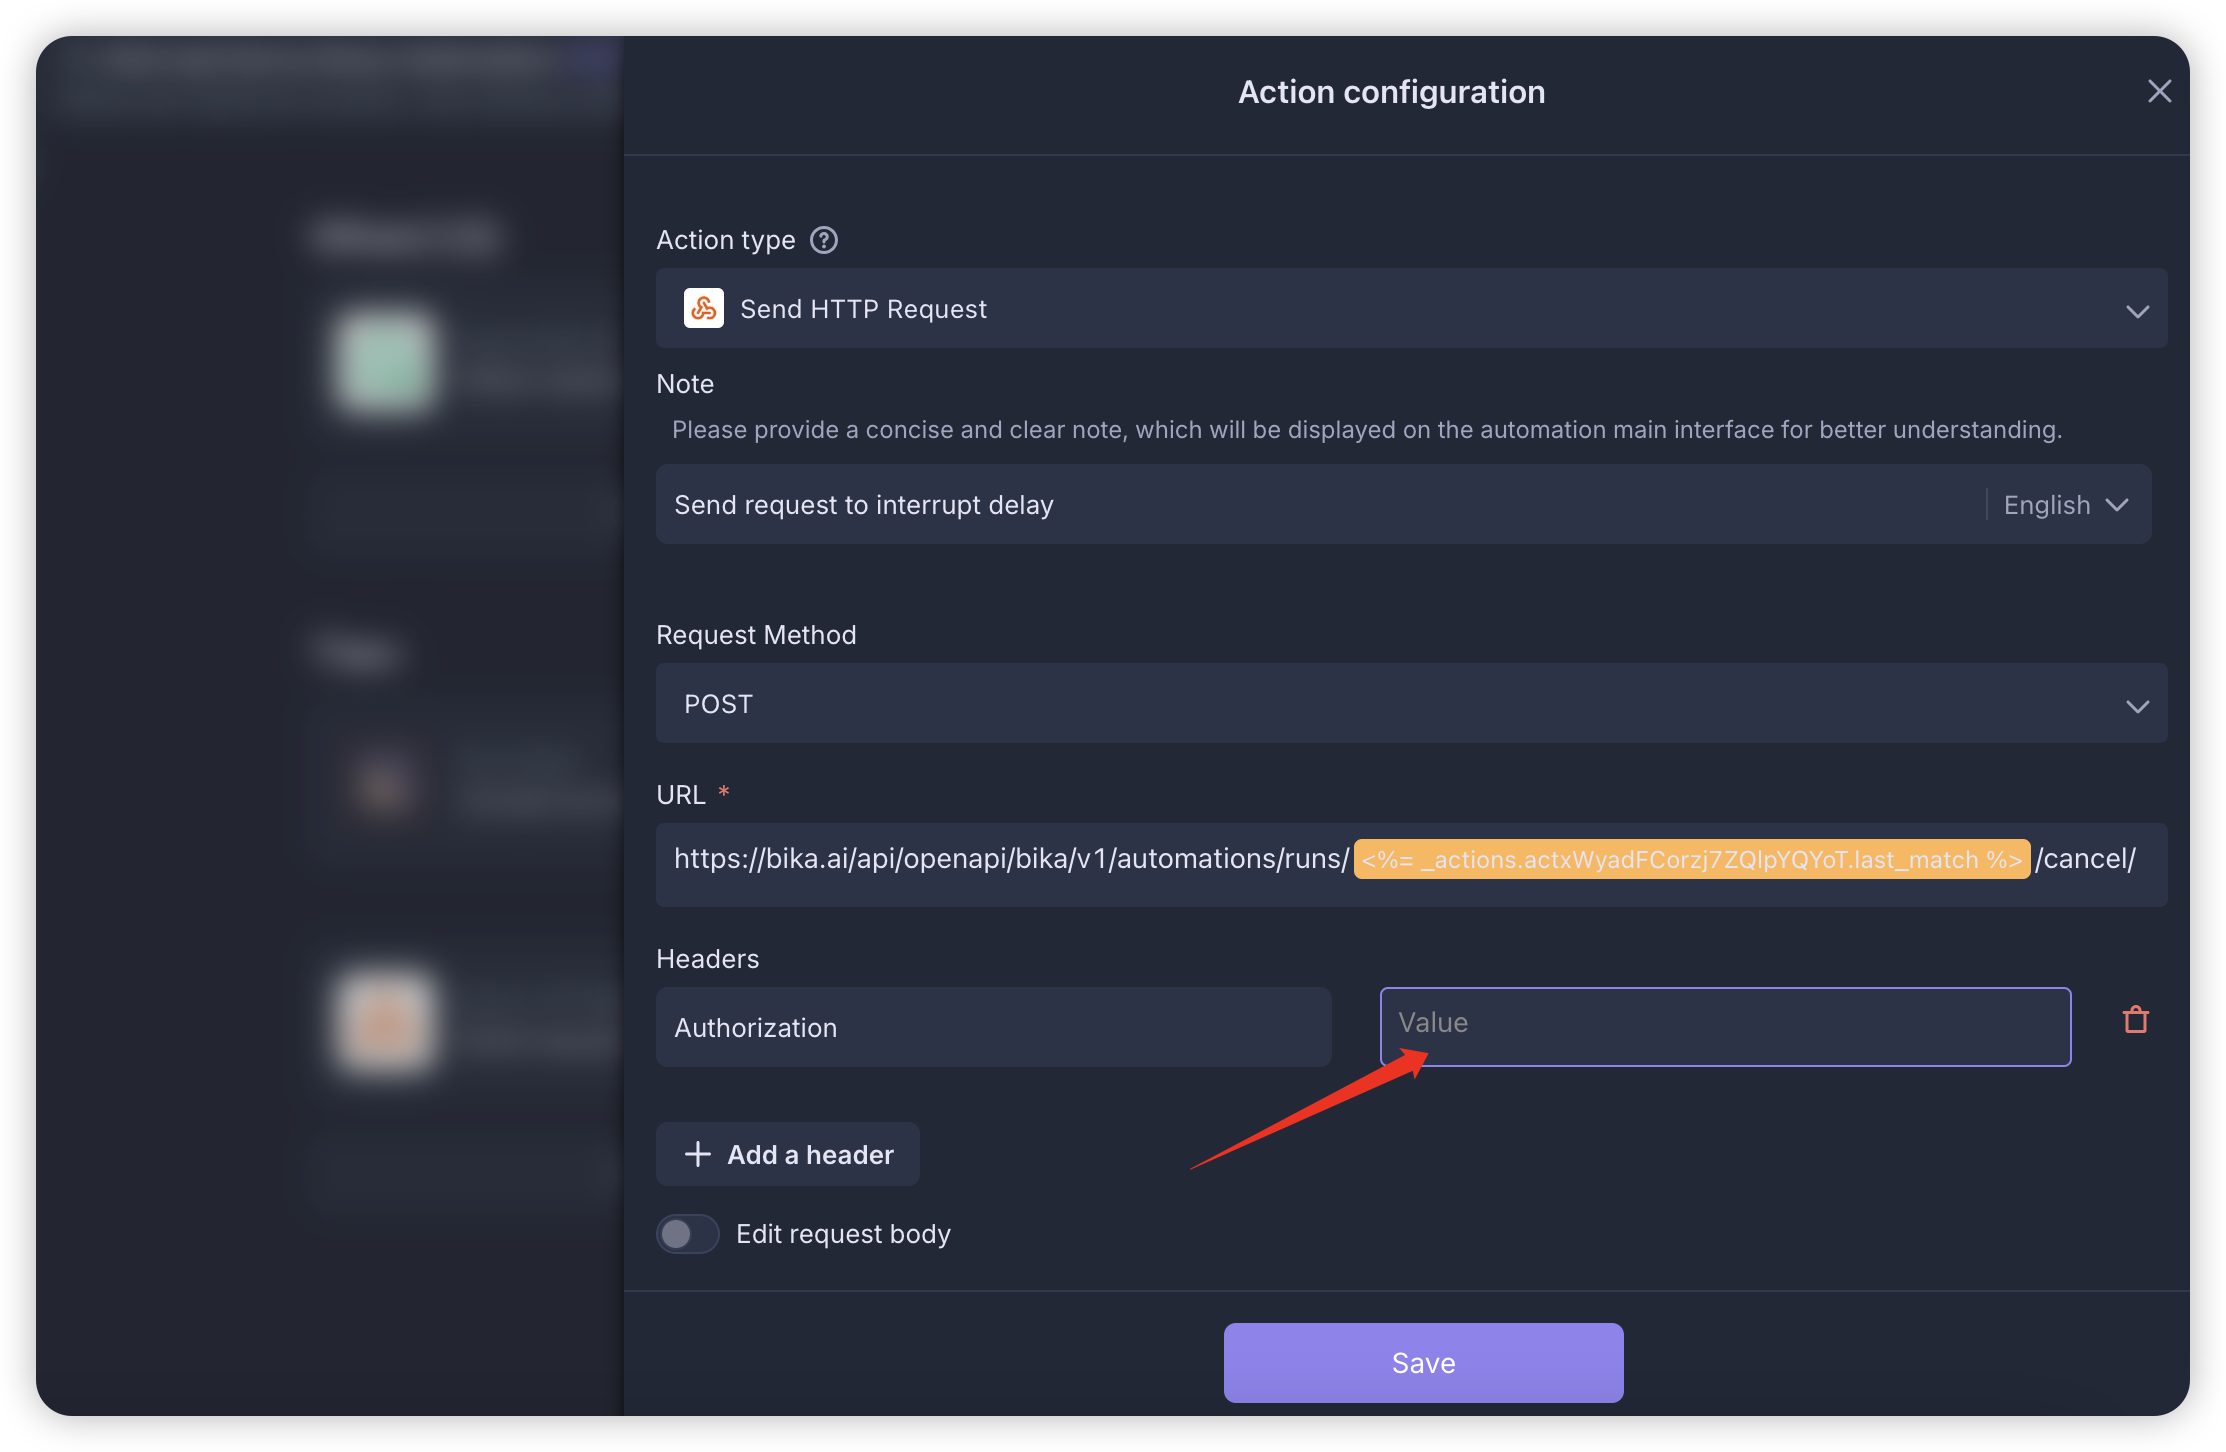
-
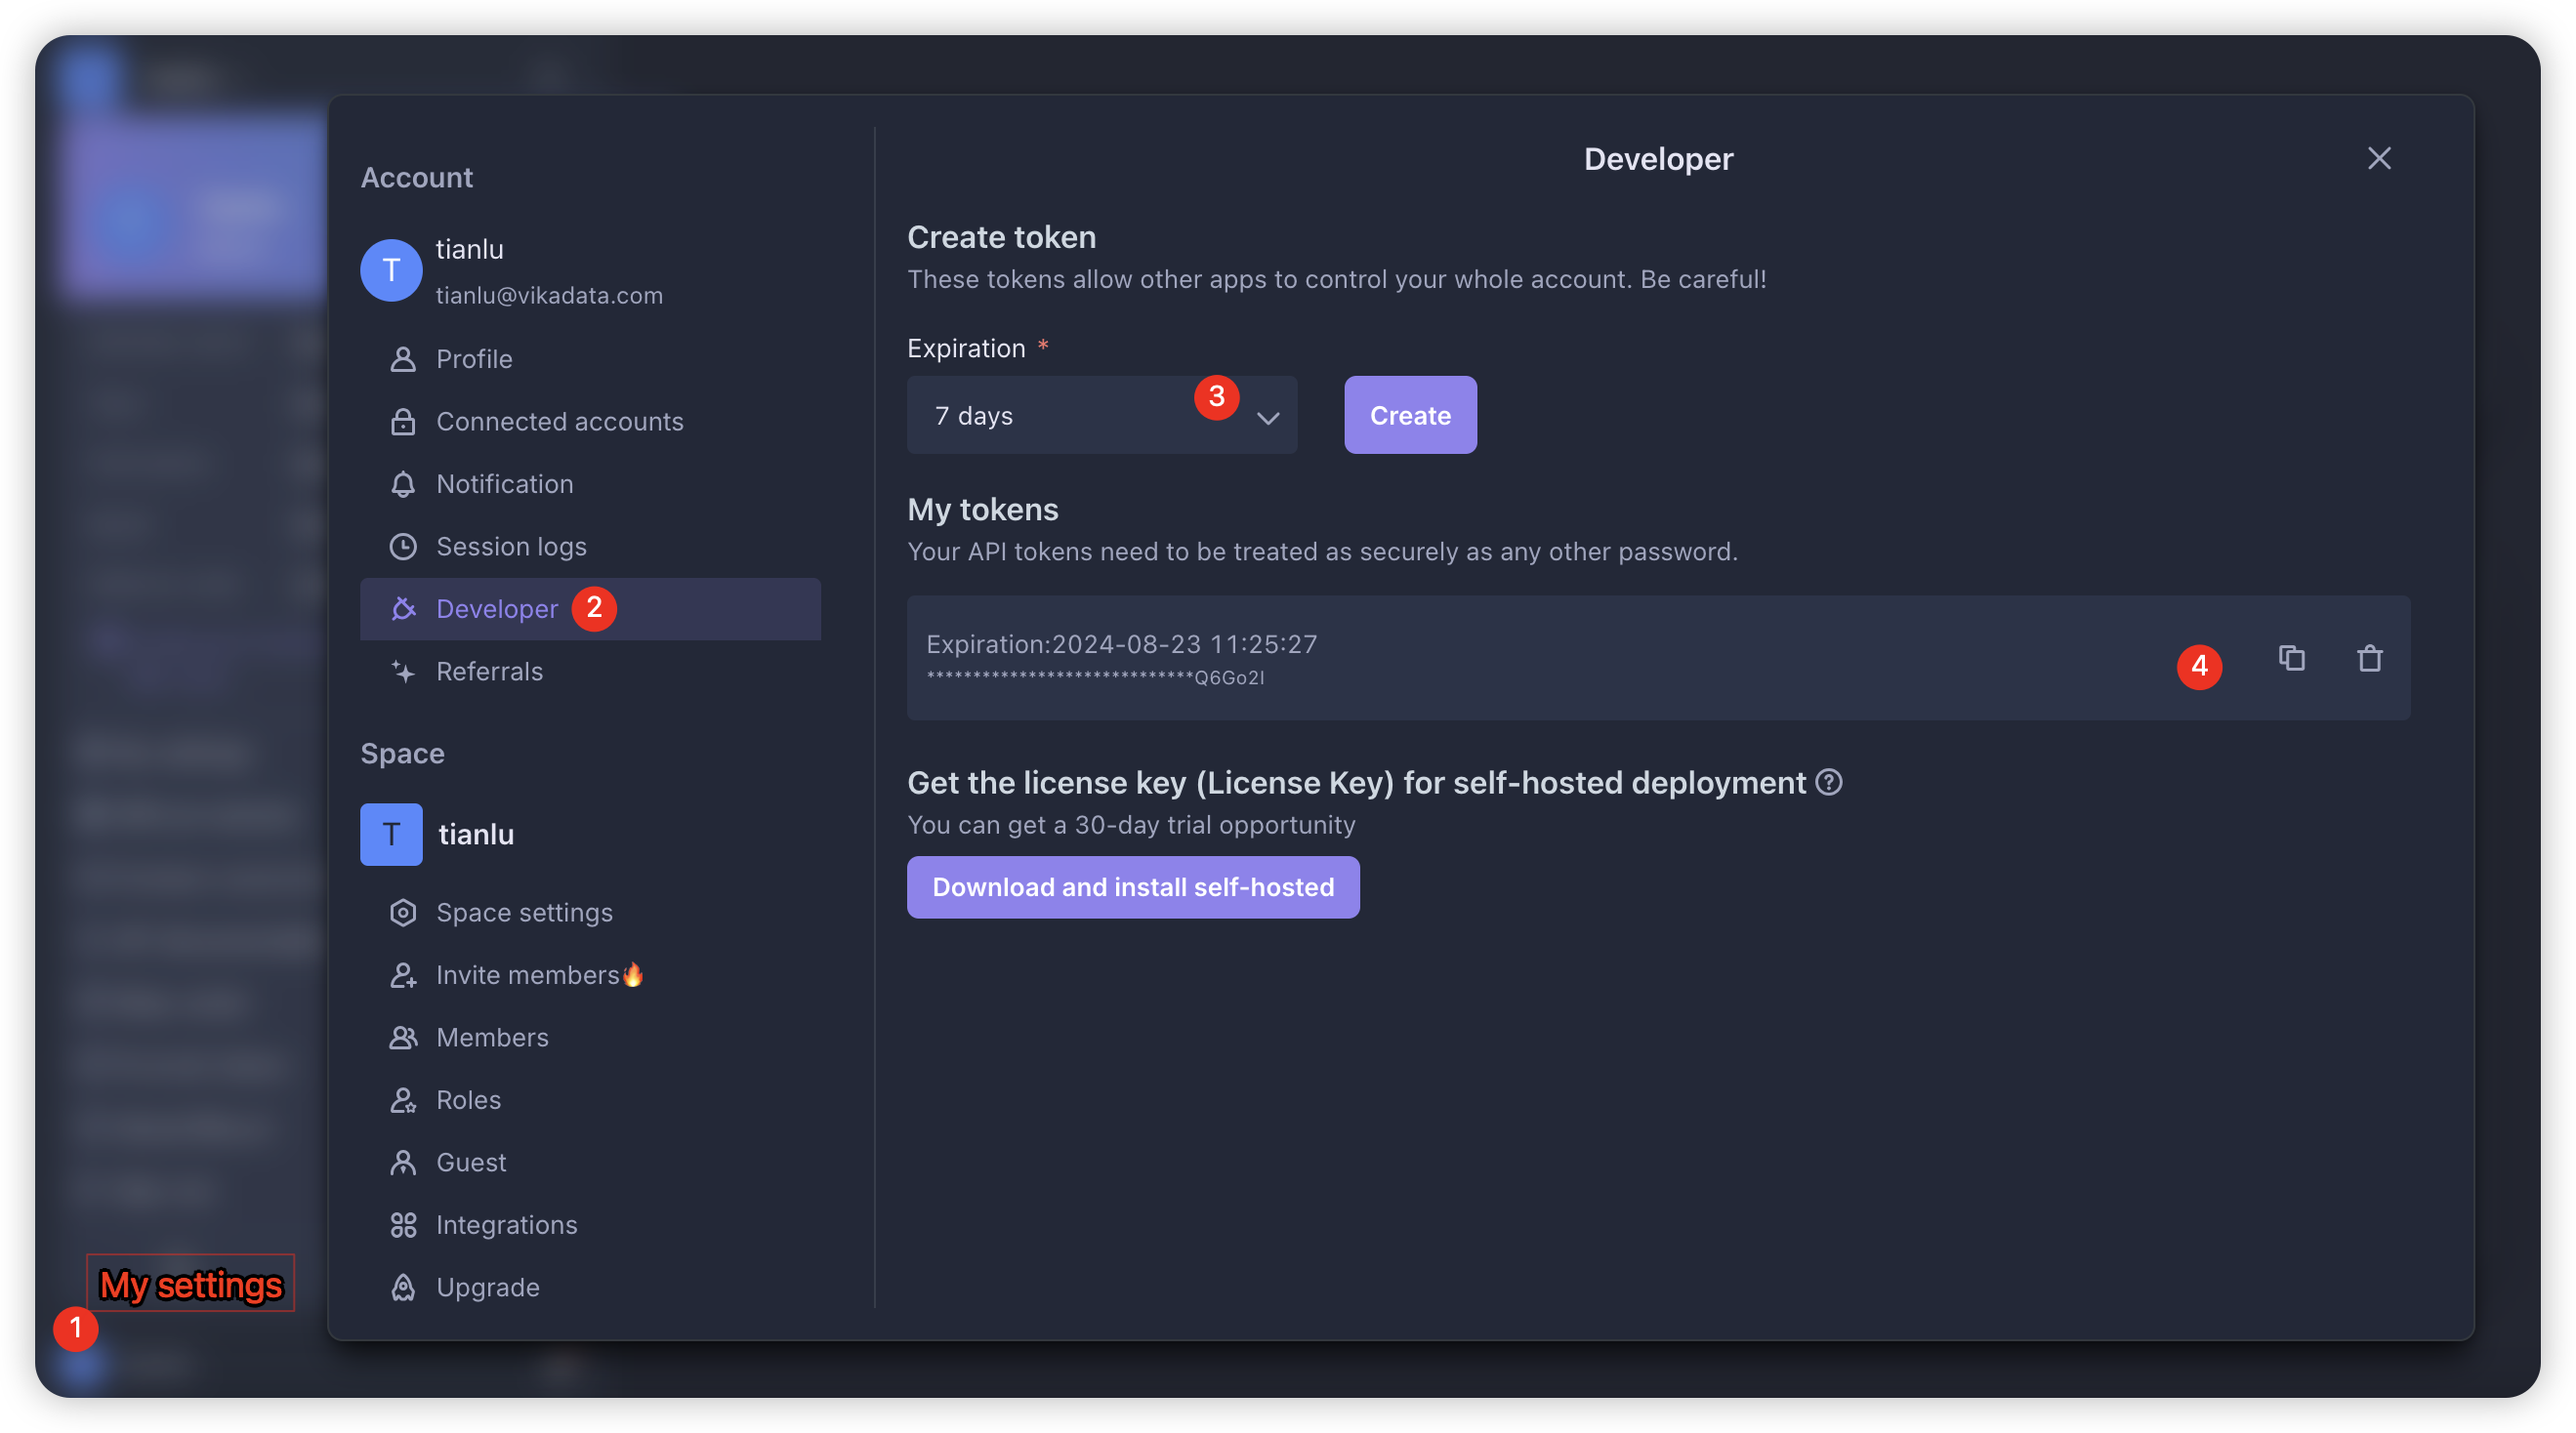
Send HTTP Request This part calls the API interface to interrupt the automation. After installation, fill in your API Token in the indicated location in the screenshot.
-
Enable Automation After confirming that the automation configuration is correct, click to enable the "Email Series Automation" and "Interruption Sequence Delay Automation."

5. Add New Users
Go to the "New Users" database, add a test email address, and change the status field to "Confirm Send Email." Real data can be automatically imported via API. Here is the relevant documentation for the Bika API.

6. Complete
Your test email should receive an email indicating that the "Email Series Automation" process has successfully run. You can modify email content as needed or continue adding user information. Before official use, ensure all email titles and content are correctly configured.
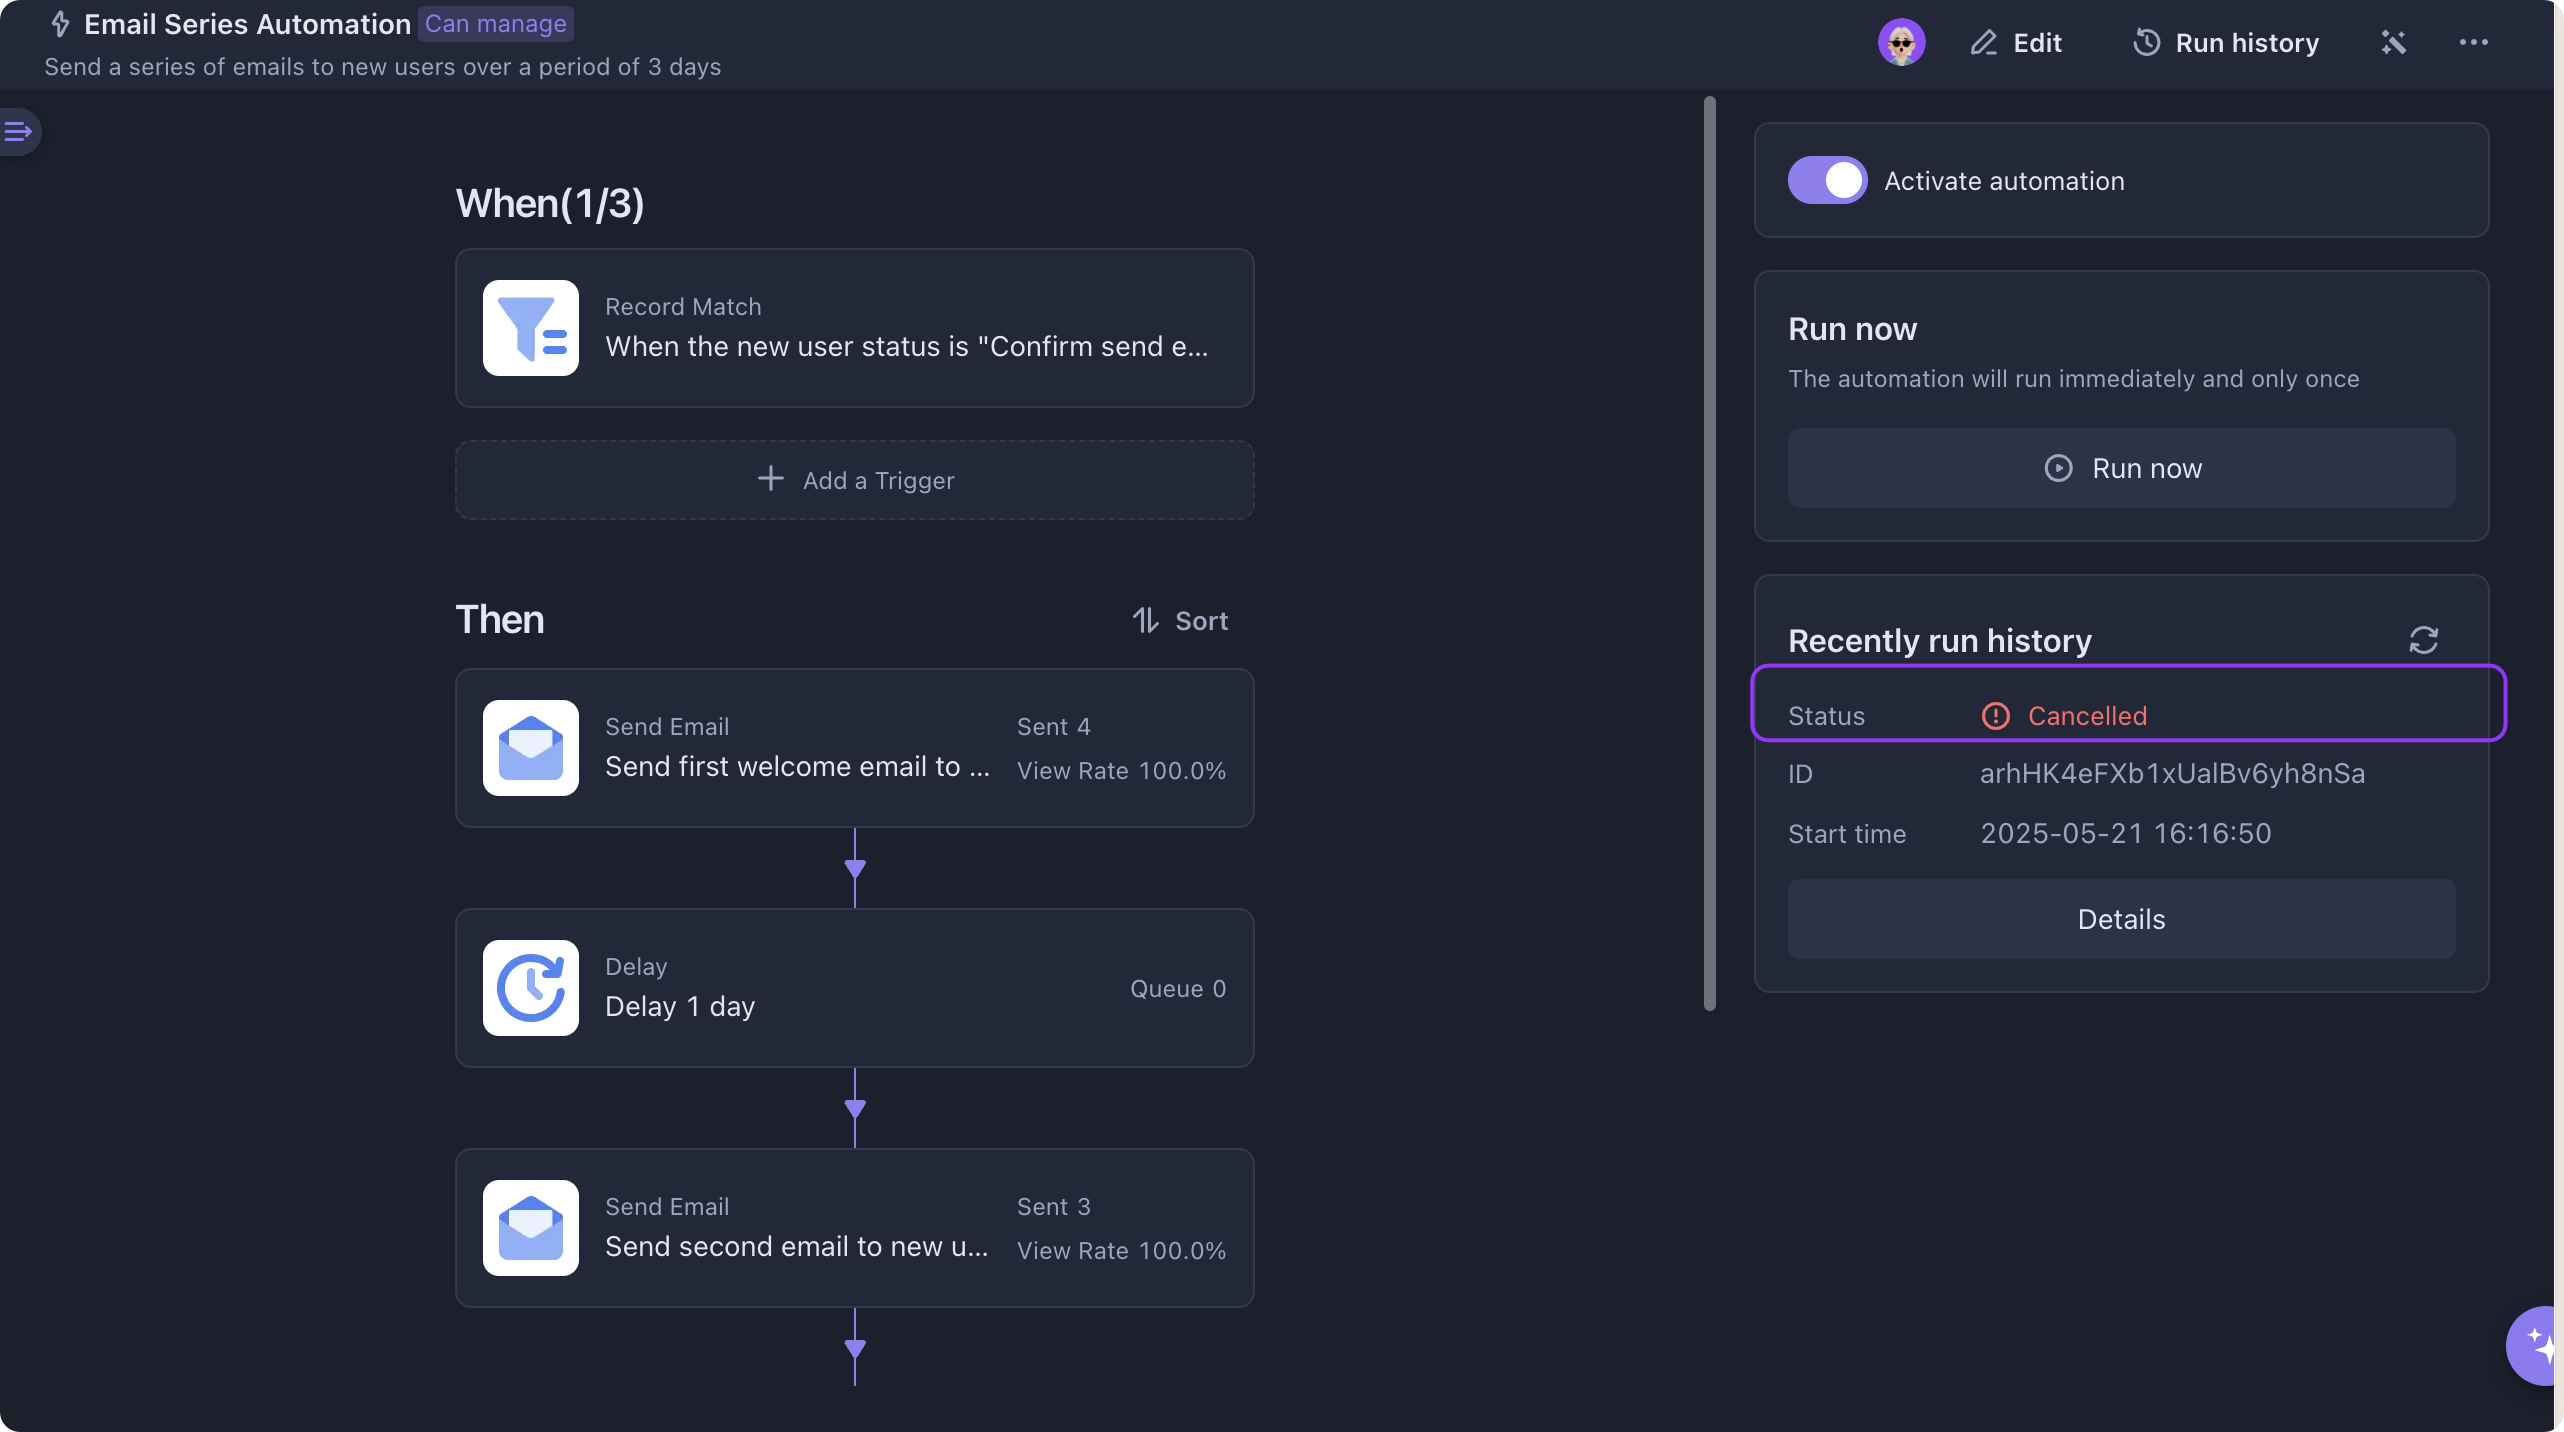
After receiving an email, any reply from your test email will allow you to observe whether the "Interruption Delay Sequence Automation" runs successfully. If it runs successfully, the status will change to "Cancel Run" in the "Email Series Automation" run history, indicating that both automations have successfully executed.
👉 Suitable Users
- SaaS Product Managers: Looking to enhance new user activation and retention rates.
- Marketing Professionals: Aiming to increase user engagement through targeted email marketing.
- Customer Success Teams: Guiding new users through initial setup and providing necessary support.
- Startup Founders: Ensuring new users quickly understand the core functionalities of the product.
- Product Operations Personnel: Utilizing automated processes to optimize users' initial experiences.
⭐ Key Features of This Template
- Automated Processes: One-click activation to automatically send email sequences, saving time and effort.
- Personalized Content: Sending customized emails based on user needs enhances interaction effectiveness.
- Improved User Activation Rates: A systematic guidance process significantly boosts user product activation and retention rates.
FAQ
Q1: How are email sequences sent?
A1: When a new user's status is updated to "Confirm Send Email," the automation process immediately sends the first email and continues to send one subsequent email each day for the next 6 days to help users familiarize themselves with the product.
Q2: How can I modify email content?
A2: In the automation node, you can click through each email sending step to easily modify the email titles and content to better align with user needs and brand image.