连续3天自动化邮件触达
连续3天自动化邮件触达
v1.0.3
Tianlu
快速建立一个连续 3 天邮件自动触达的用户旅程,特别适用于以下场景:潜在客户的持续跟进、产品发布倒计时的连续营销、新注册用户的多阶段欢迎邮件等。
📣 行銷
📧 郵件
🤖 自動化
包含資源
邮件序列自动化
打断序列延时自动化
新用戶表
流程圖
流程圖
连续3天自动化邮件触达的流程圖
變更日誌
變更日誌
连续3天自动化邮件触达的變更日誌
3-Day Outreach Email Campaign Template
In SaaS businesses, converting new registrations into active users is a crucial step. Timely and personalized email interactions can significantly increase user activation and retention rates. This template is designed to help you guide new users to understand and use your product better during the critical first three days after registration. It aims to promote early engagement and satisfaction.
- Customer Interaction Journey: On the 1st, 2nd, and 3rd days after user registration, the system will send customized emails respectively. If the user does not respond to the previous email, the system will automatically send the next email according to the preset rules, continuing to advance the three-day email conversion process.
- Once the user replies to the email, the system will automatically identify and pause the sending of subsequent emails. For example, if the user replies to the email on the 2nd day, the email originally scheduled to be sent on the 3rd day will be canceled. This interruption mechanism not only enhances the authenticity of the interaction but also effectively avoids over-disturbing the user. You can also choose to set a button in the email for users to opt out of receiving subsequent emails. This setting will be detailed in the usage steps.
By using the "3-Day Outreach Email Campaign" template, you can more effectively guide new users to understand and use your product, increase user activation and retention rates, and drive business growth. At the same time, by analyzing email open rates and click-through rates, you can optimize email content and sending strategies to improve marketing effectiveness.
👉 How the Template Works
This template is designed to enhance user experience and reduce early churn, covering the following two core functions:
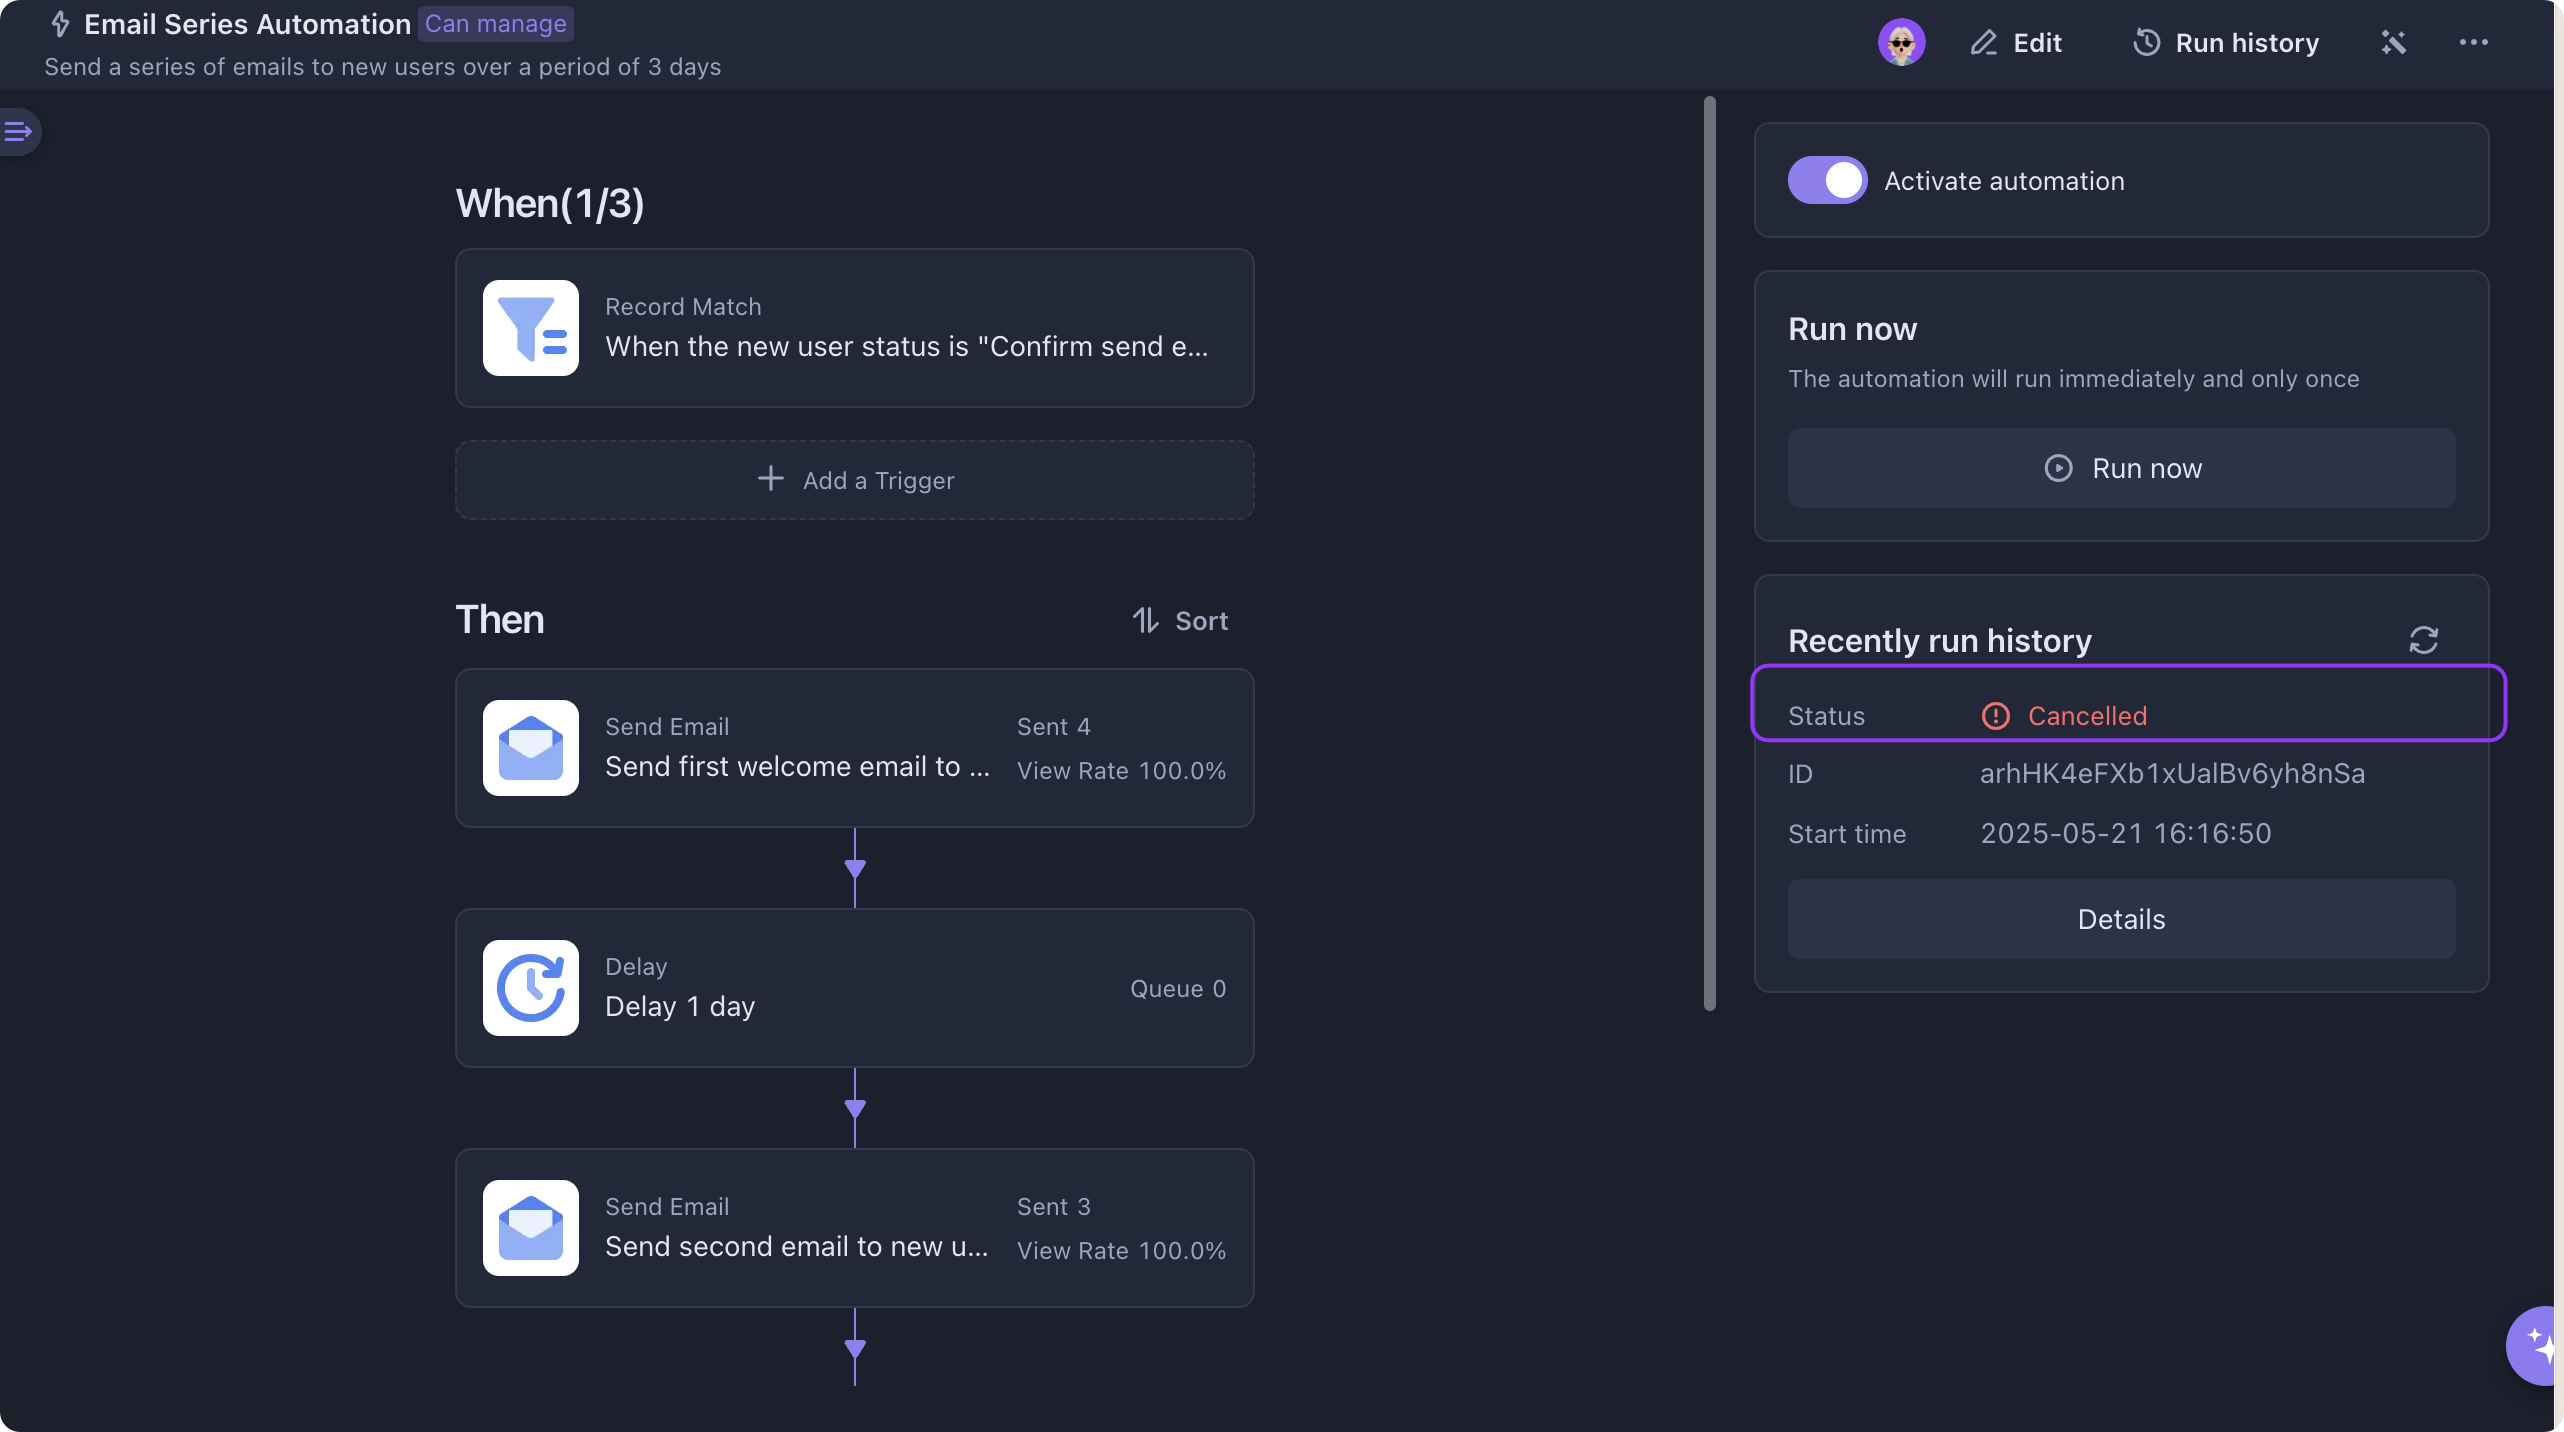
- Email Series Automation: When the user status is updated to "Confirmed to Send Email," this automation will automatically start. It will send a preset marketing email every day for three consecutive days to guide users to familiarize themselves with product features and usage processes.
- Interrupt Series Delay Automation: When the user replies to the email, the system automatically recognizes it and interrupts the subsequent delayed emails to avoid unnecessary disturbances.
- New Users: This database stores information and email addresses of all new users. It supports manual input, form submission, Excel import, and API data synchronization.
🎯 Steps to Use
1. Install the Template
Log in to the Bika platform and install the "3-Day Outreach Email Campaign" template.
2. Complete Initialization Tasks
Follow the system prompts to enter the "Email Series Automation" node. Click on each email sending step in turn and enter the configuration page. If your space already has an SMTP configuration for the sending email account, select the integrated email account; if not, click "Create Integration." For details, please refer to the User Manual.

3. Customize Email Content
Based on the product features and user needs, you can adjust the email content to match your brand style. The email content format supports both Markdown and HTML, and you can choose as needed.
Next, let's introduce the design details of the interrupt delay part.
When the User Replies, Automatically Cancel the Subsequent Delayed Email Series
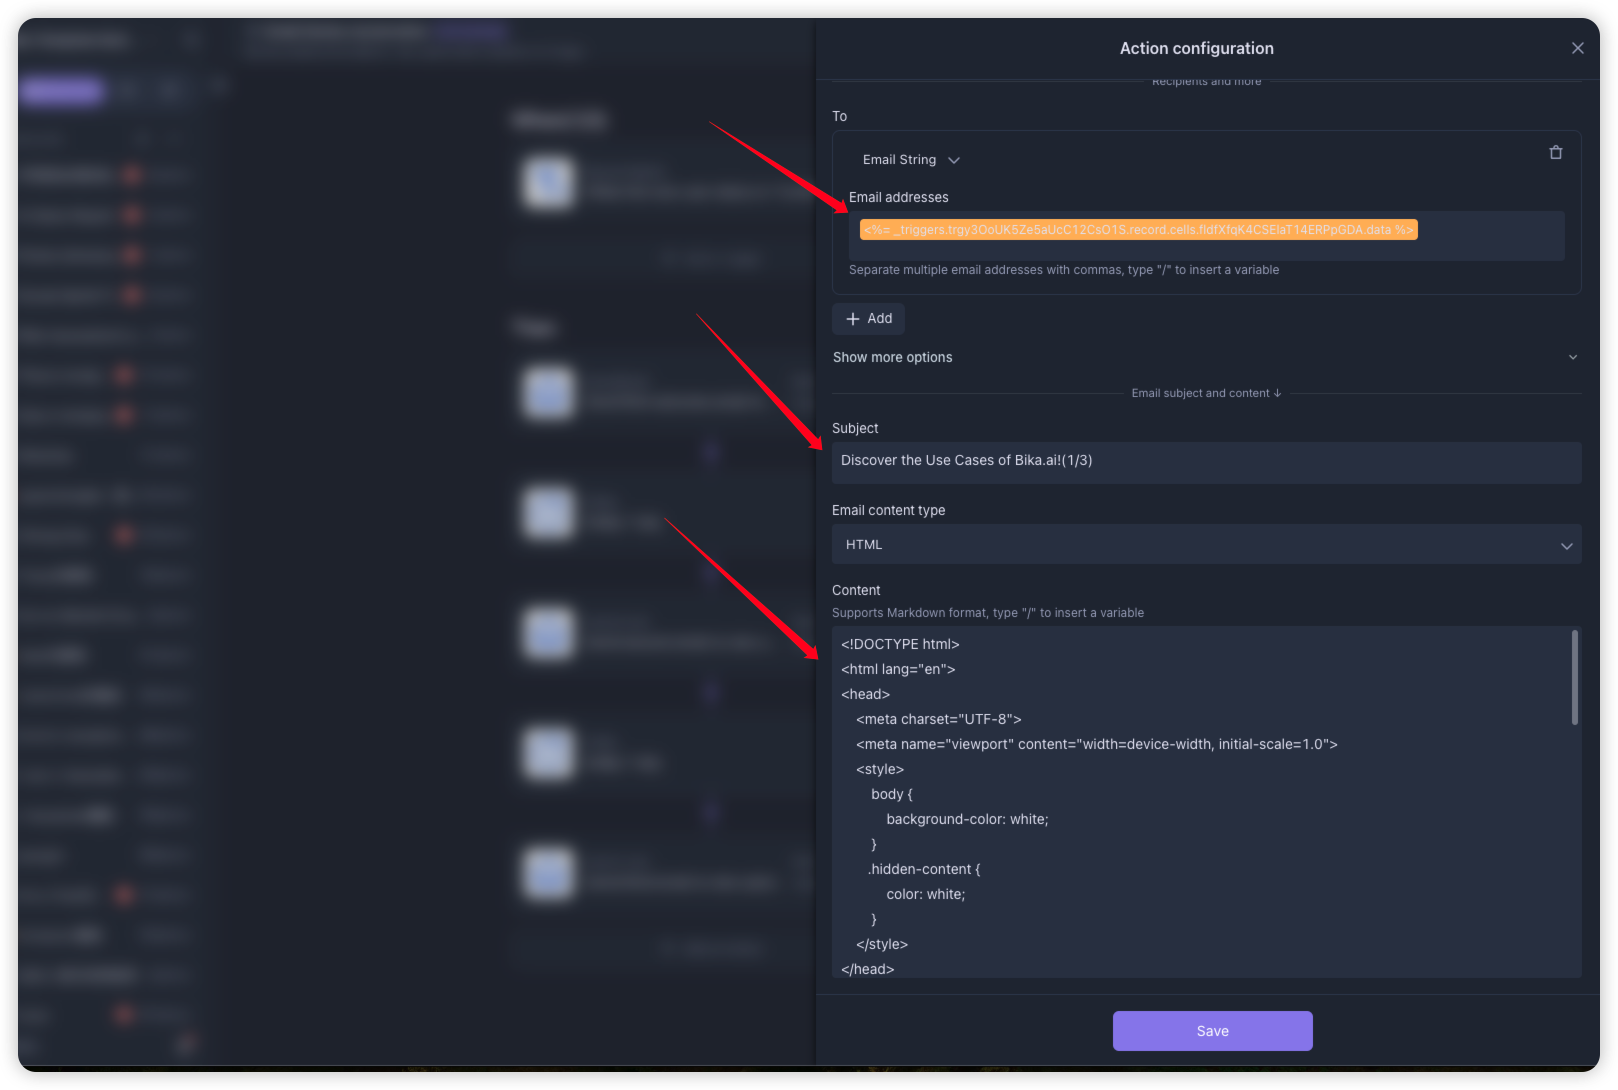
- The implementation mechanism of this method: Each email will include a special ID (automation run ID). When the user replies to the email, the system will recognize the mailbox through this ID and automatically stop sending subsequent emails. Note: When using this method, the sender and recipient must be the same email address.
Format requirements:
- Email Type: HTML
- Email Body: Set the background color of the email body and the background color of the automation run ID to white, for example:
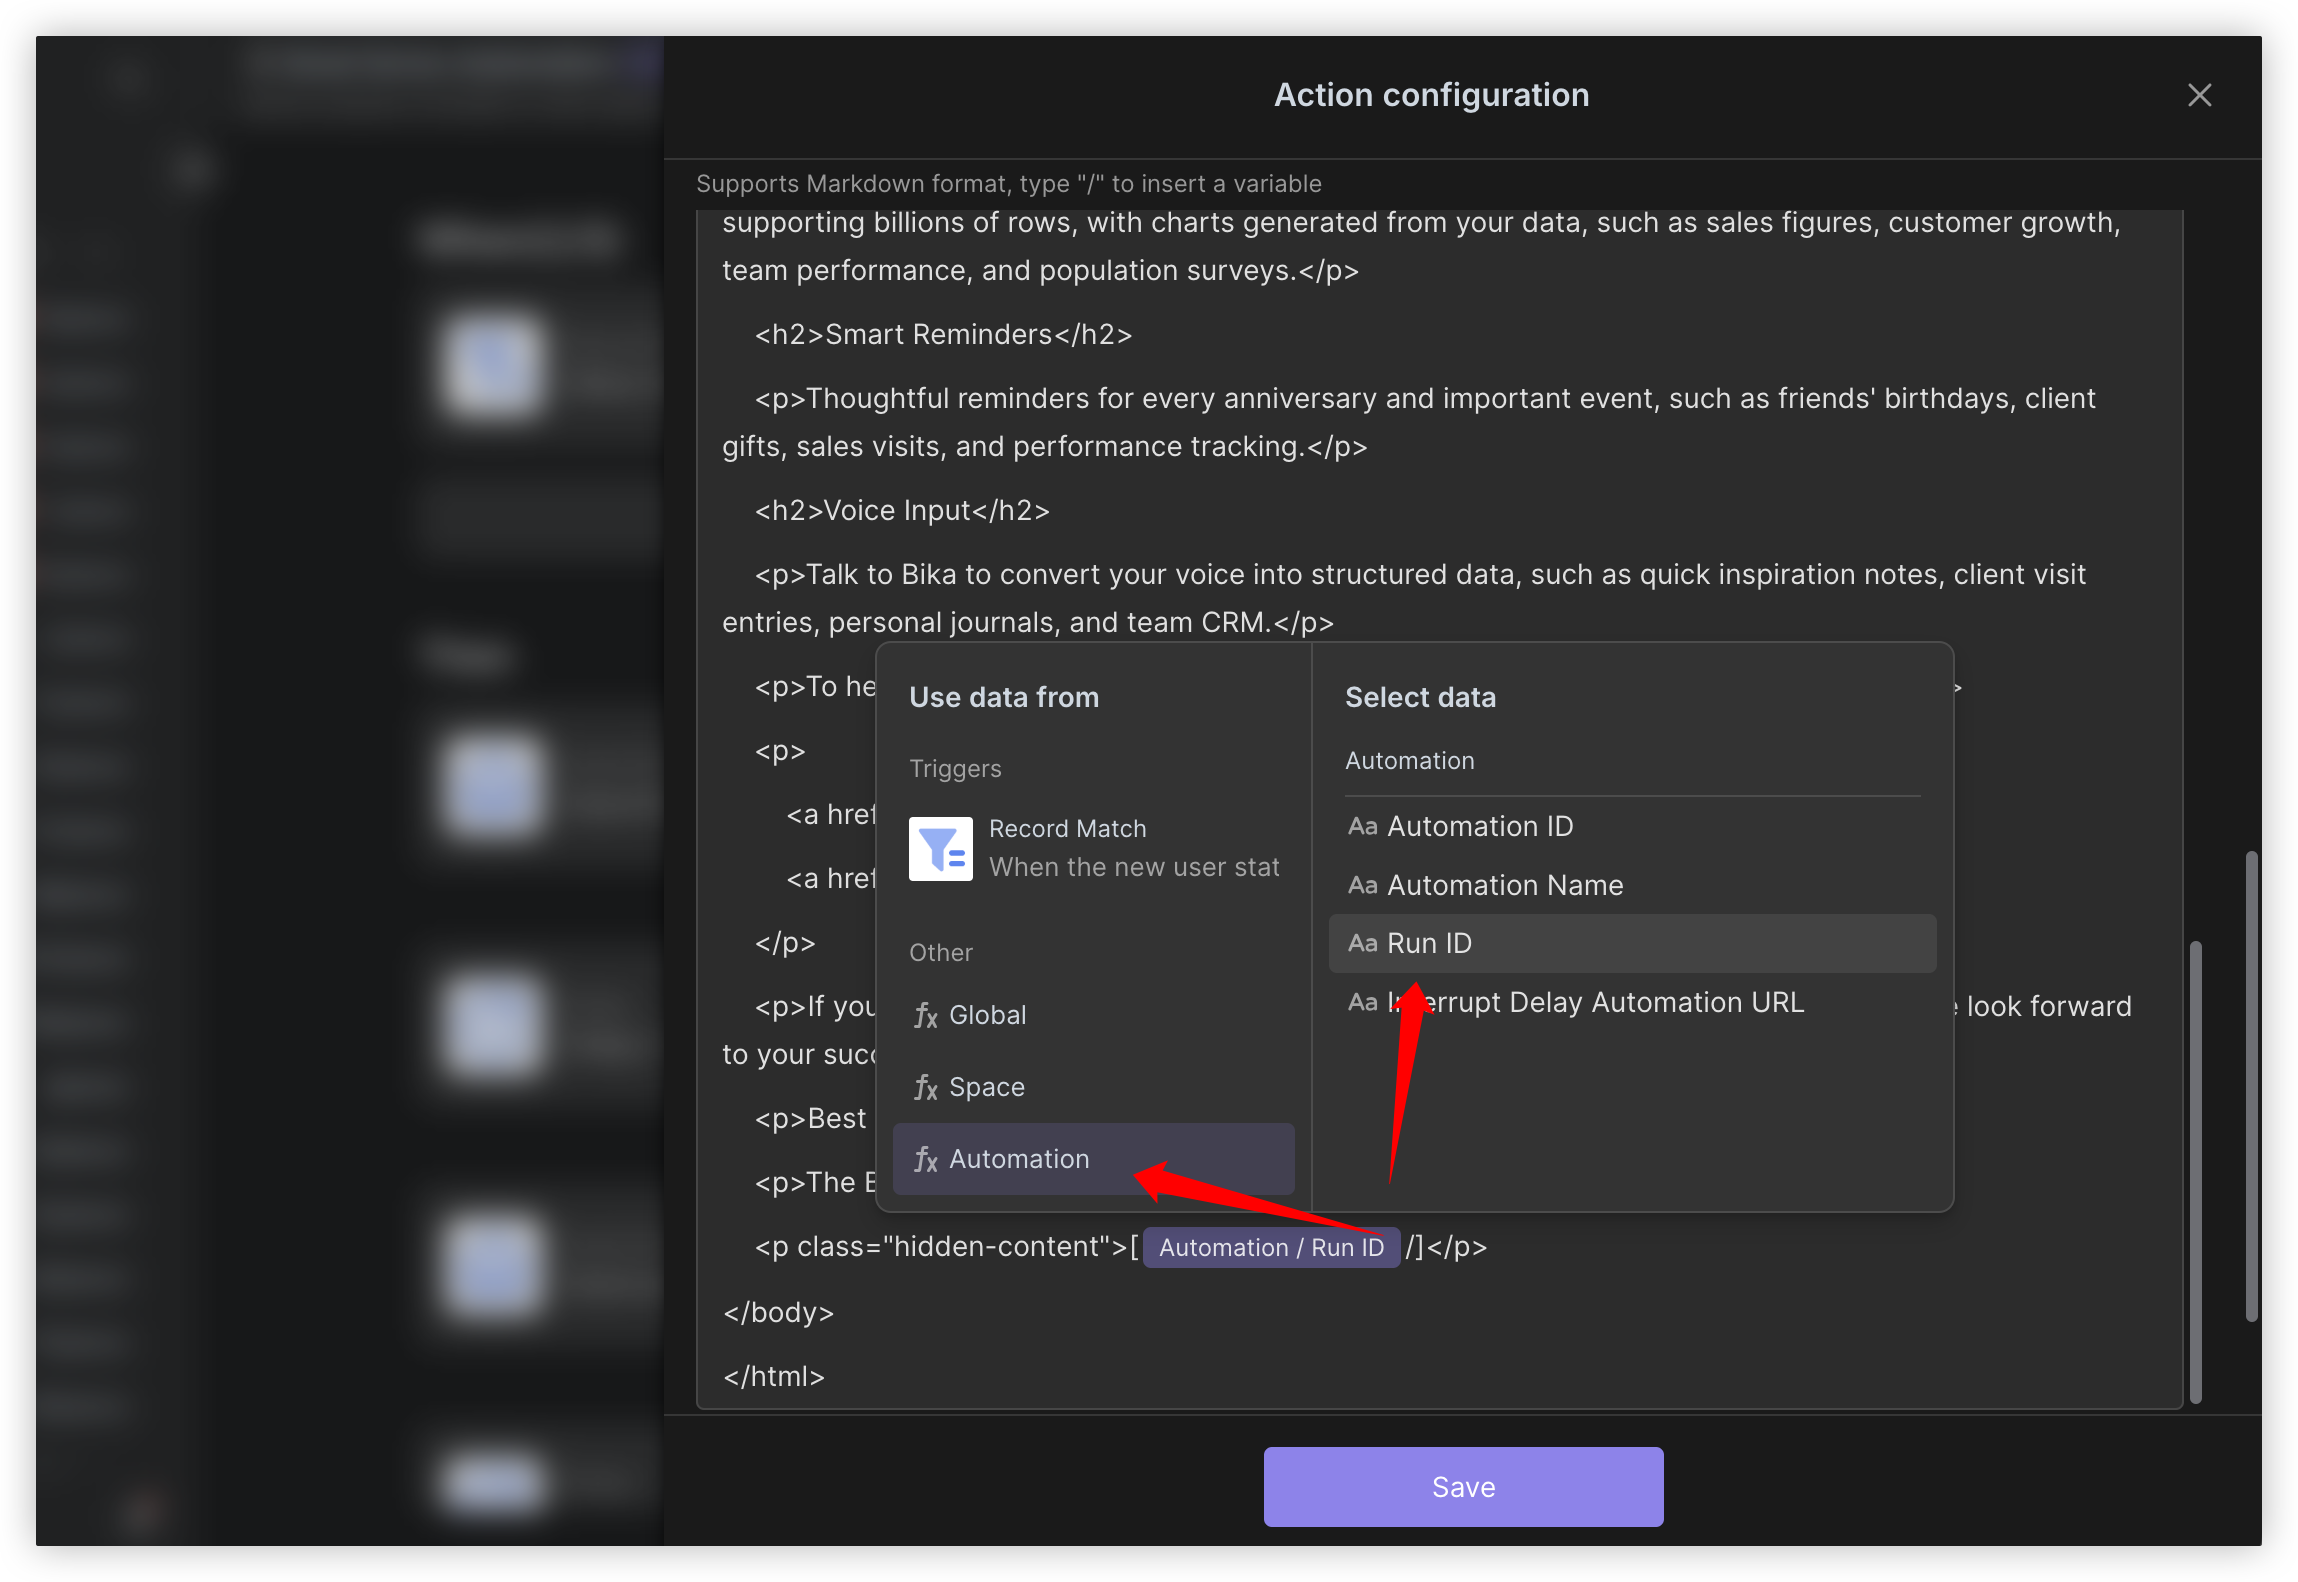
// In the header file, set the overall background color of the page and the text color of the element with the class name hidden-content to white; <style> body { background-color: white; } .hidden-content { color: white; } </style>// At the end of the email, set the automation run ID with the class attribute named hidden-content. By setting the text color to white, these elements will be "hidden" visually; <p class="hidden-content">[<%= _automation.runHistoryId %>]</p>- Replace
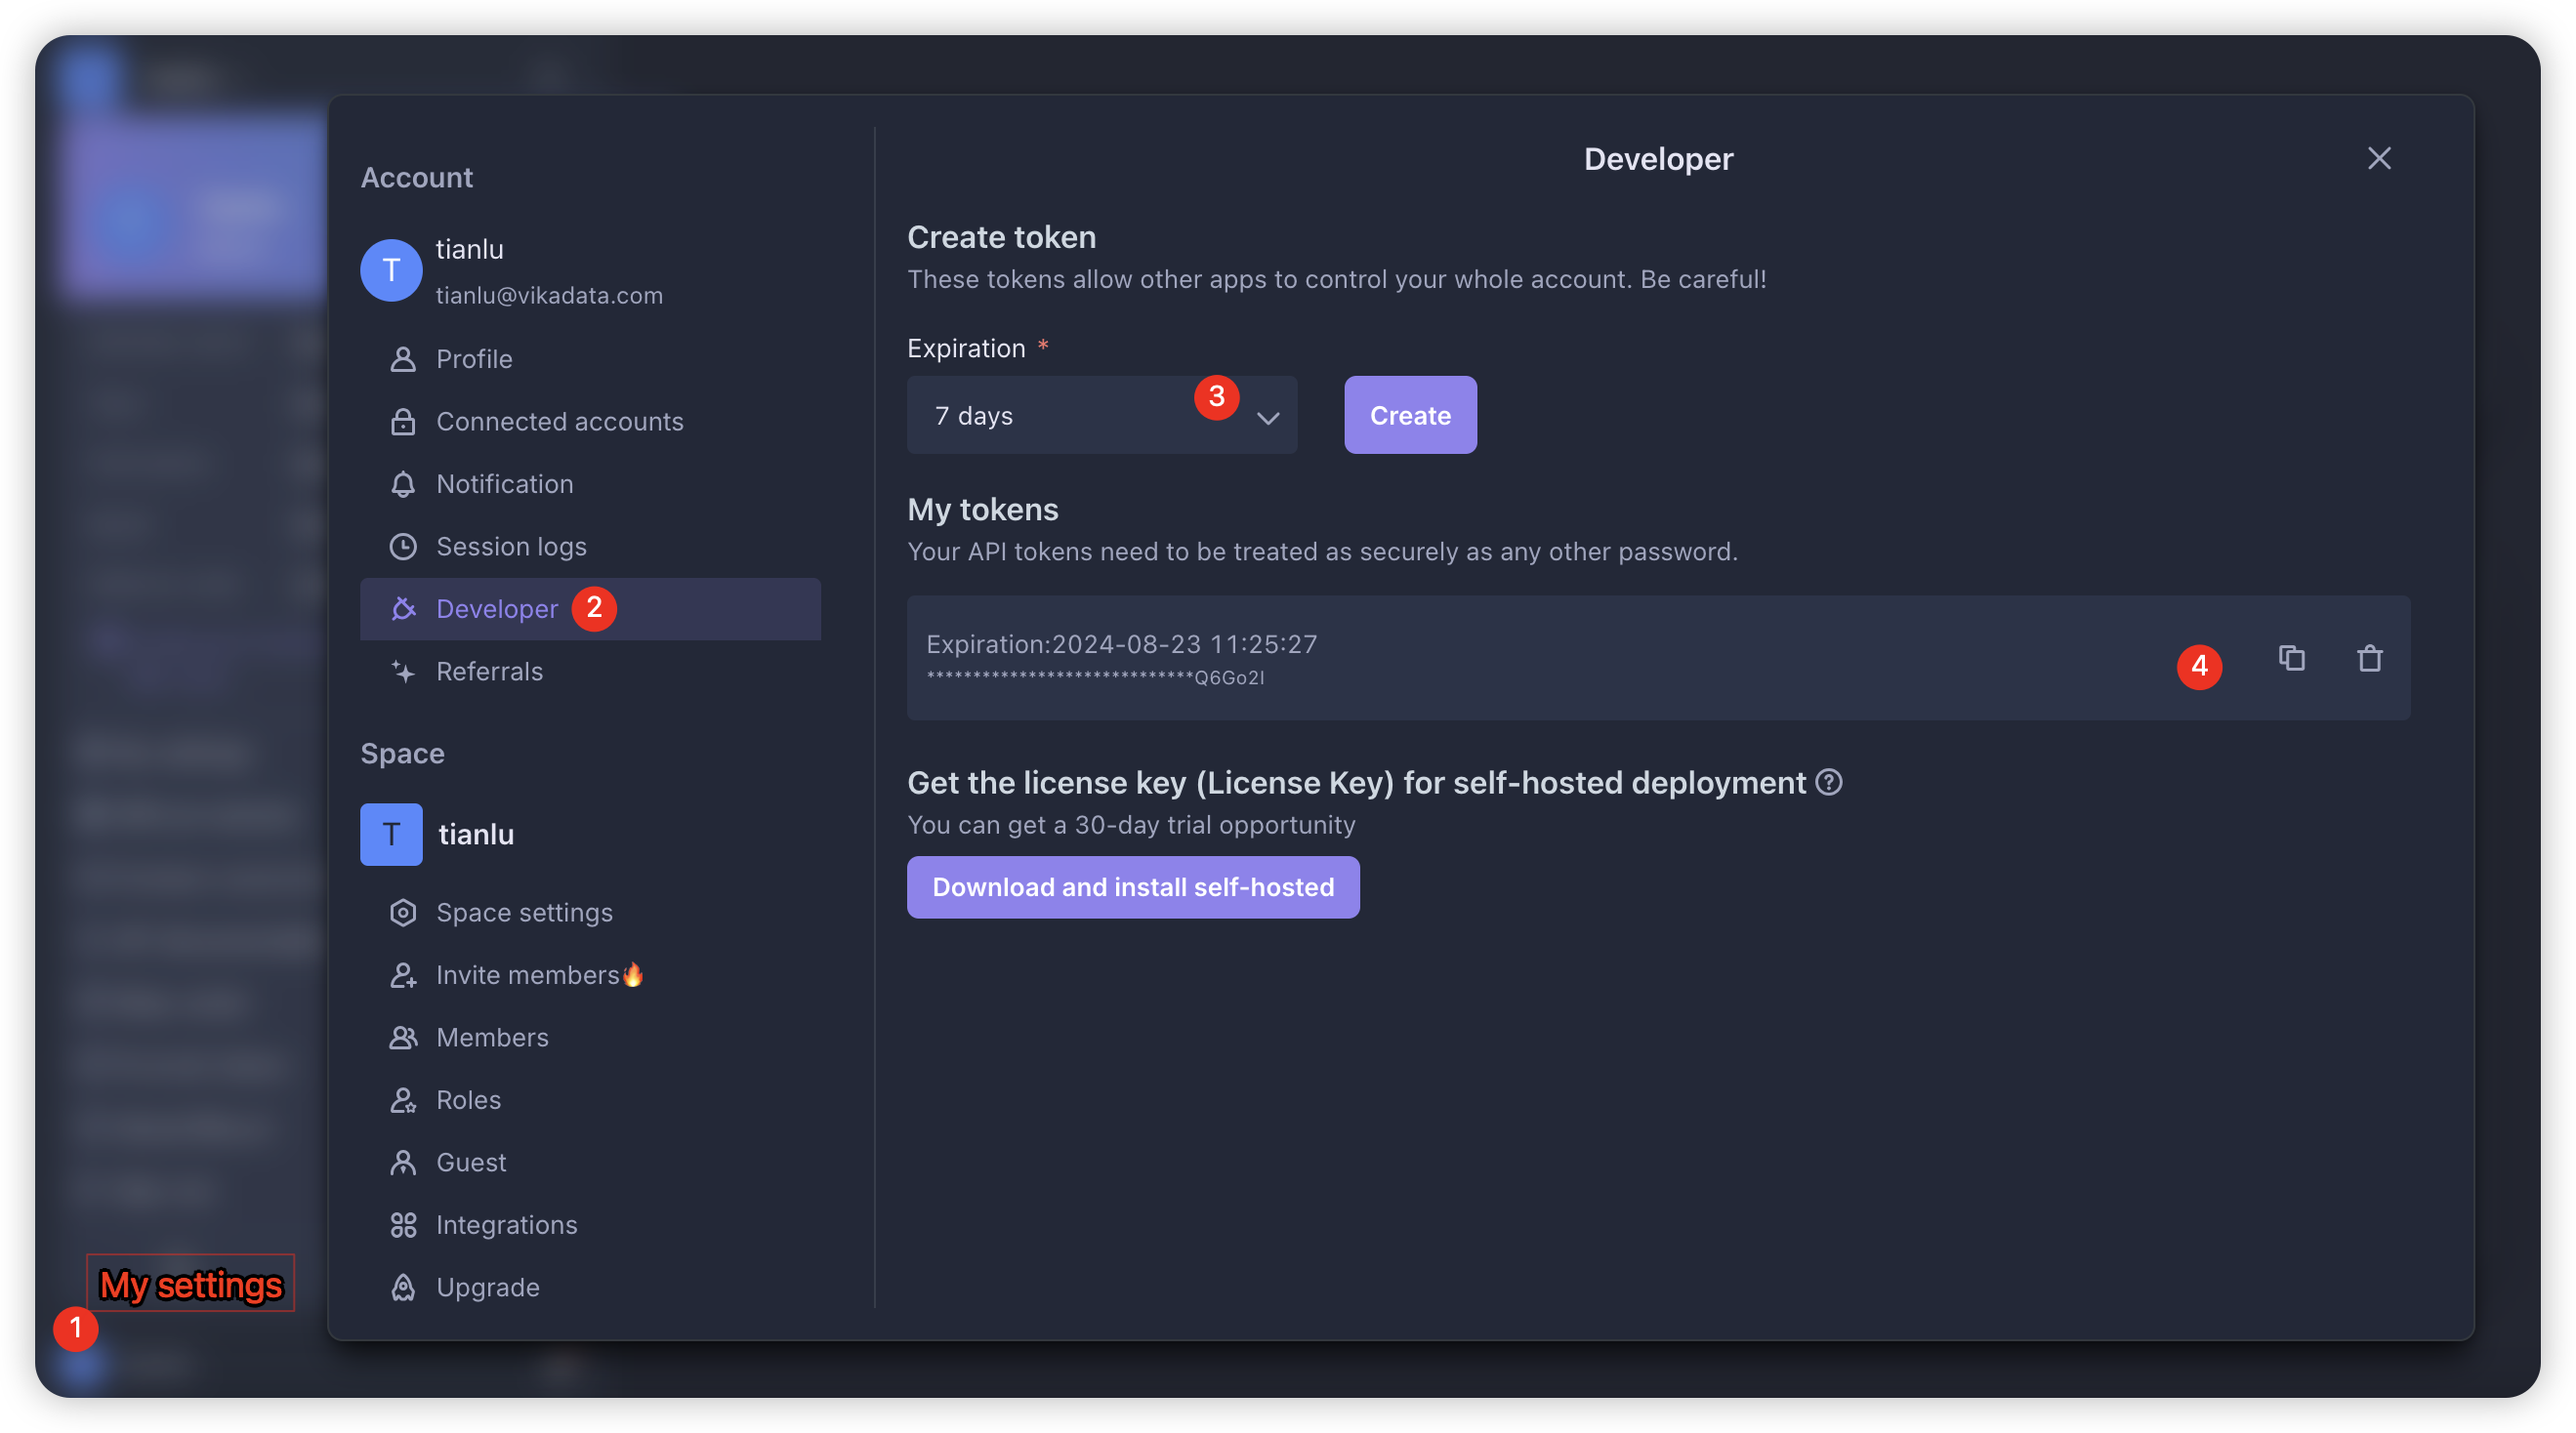
<%= _automation.runHistoryId %>with the variable. Press the English '/' key to call up the variable options and insert: Other - Automation - Automation Run ID. See the screenshot for reference.
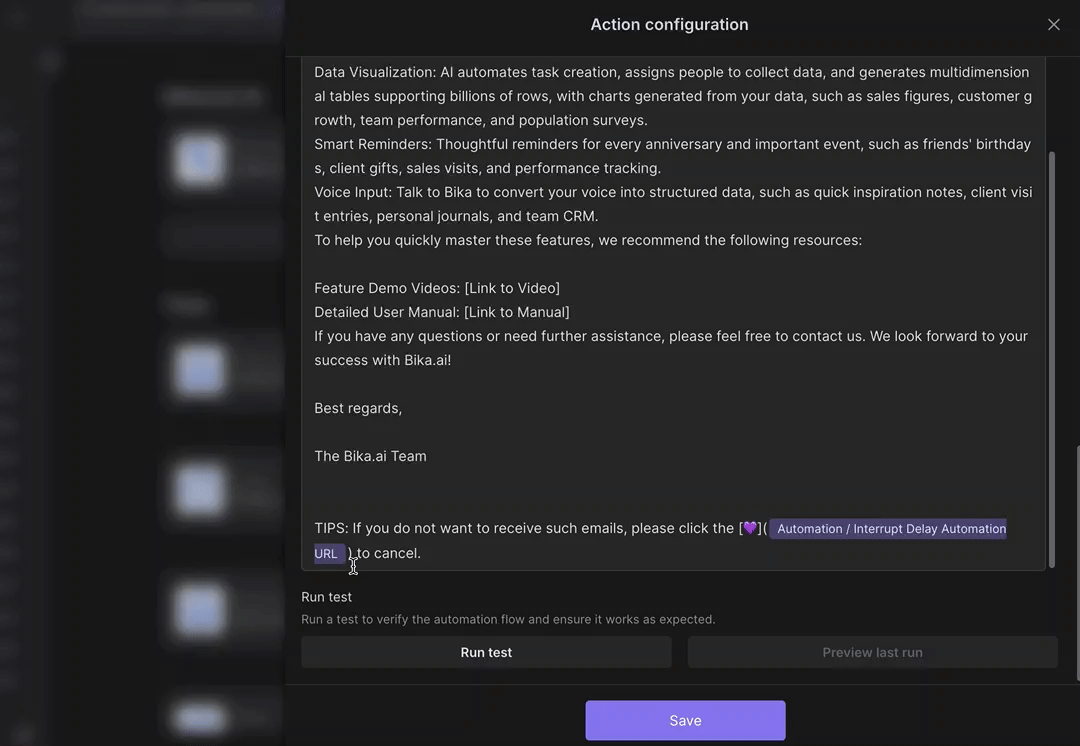
📍Alternatively, you can also set it up so that users manually click a button to cancel the subsequent delayed email Series; If you choose this method, there is no need to configure the "Interrupt Delay Series Automation" in Step 4. You just need to add a button in the email body that links to the URL for canceling the delayed automation, for example, in Markdown format:
- Email Type: Markdown
- Email Body: Add a prompt in your content, such as: If you do not want to receive such emails, please click the 💜 to cancel. The link needs to be called up by pressing '/', and insert: Other - Automation - Interrupt Delay Cancel Automation URL. See the screenshot for reference.
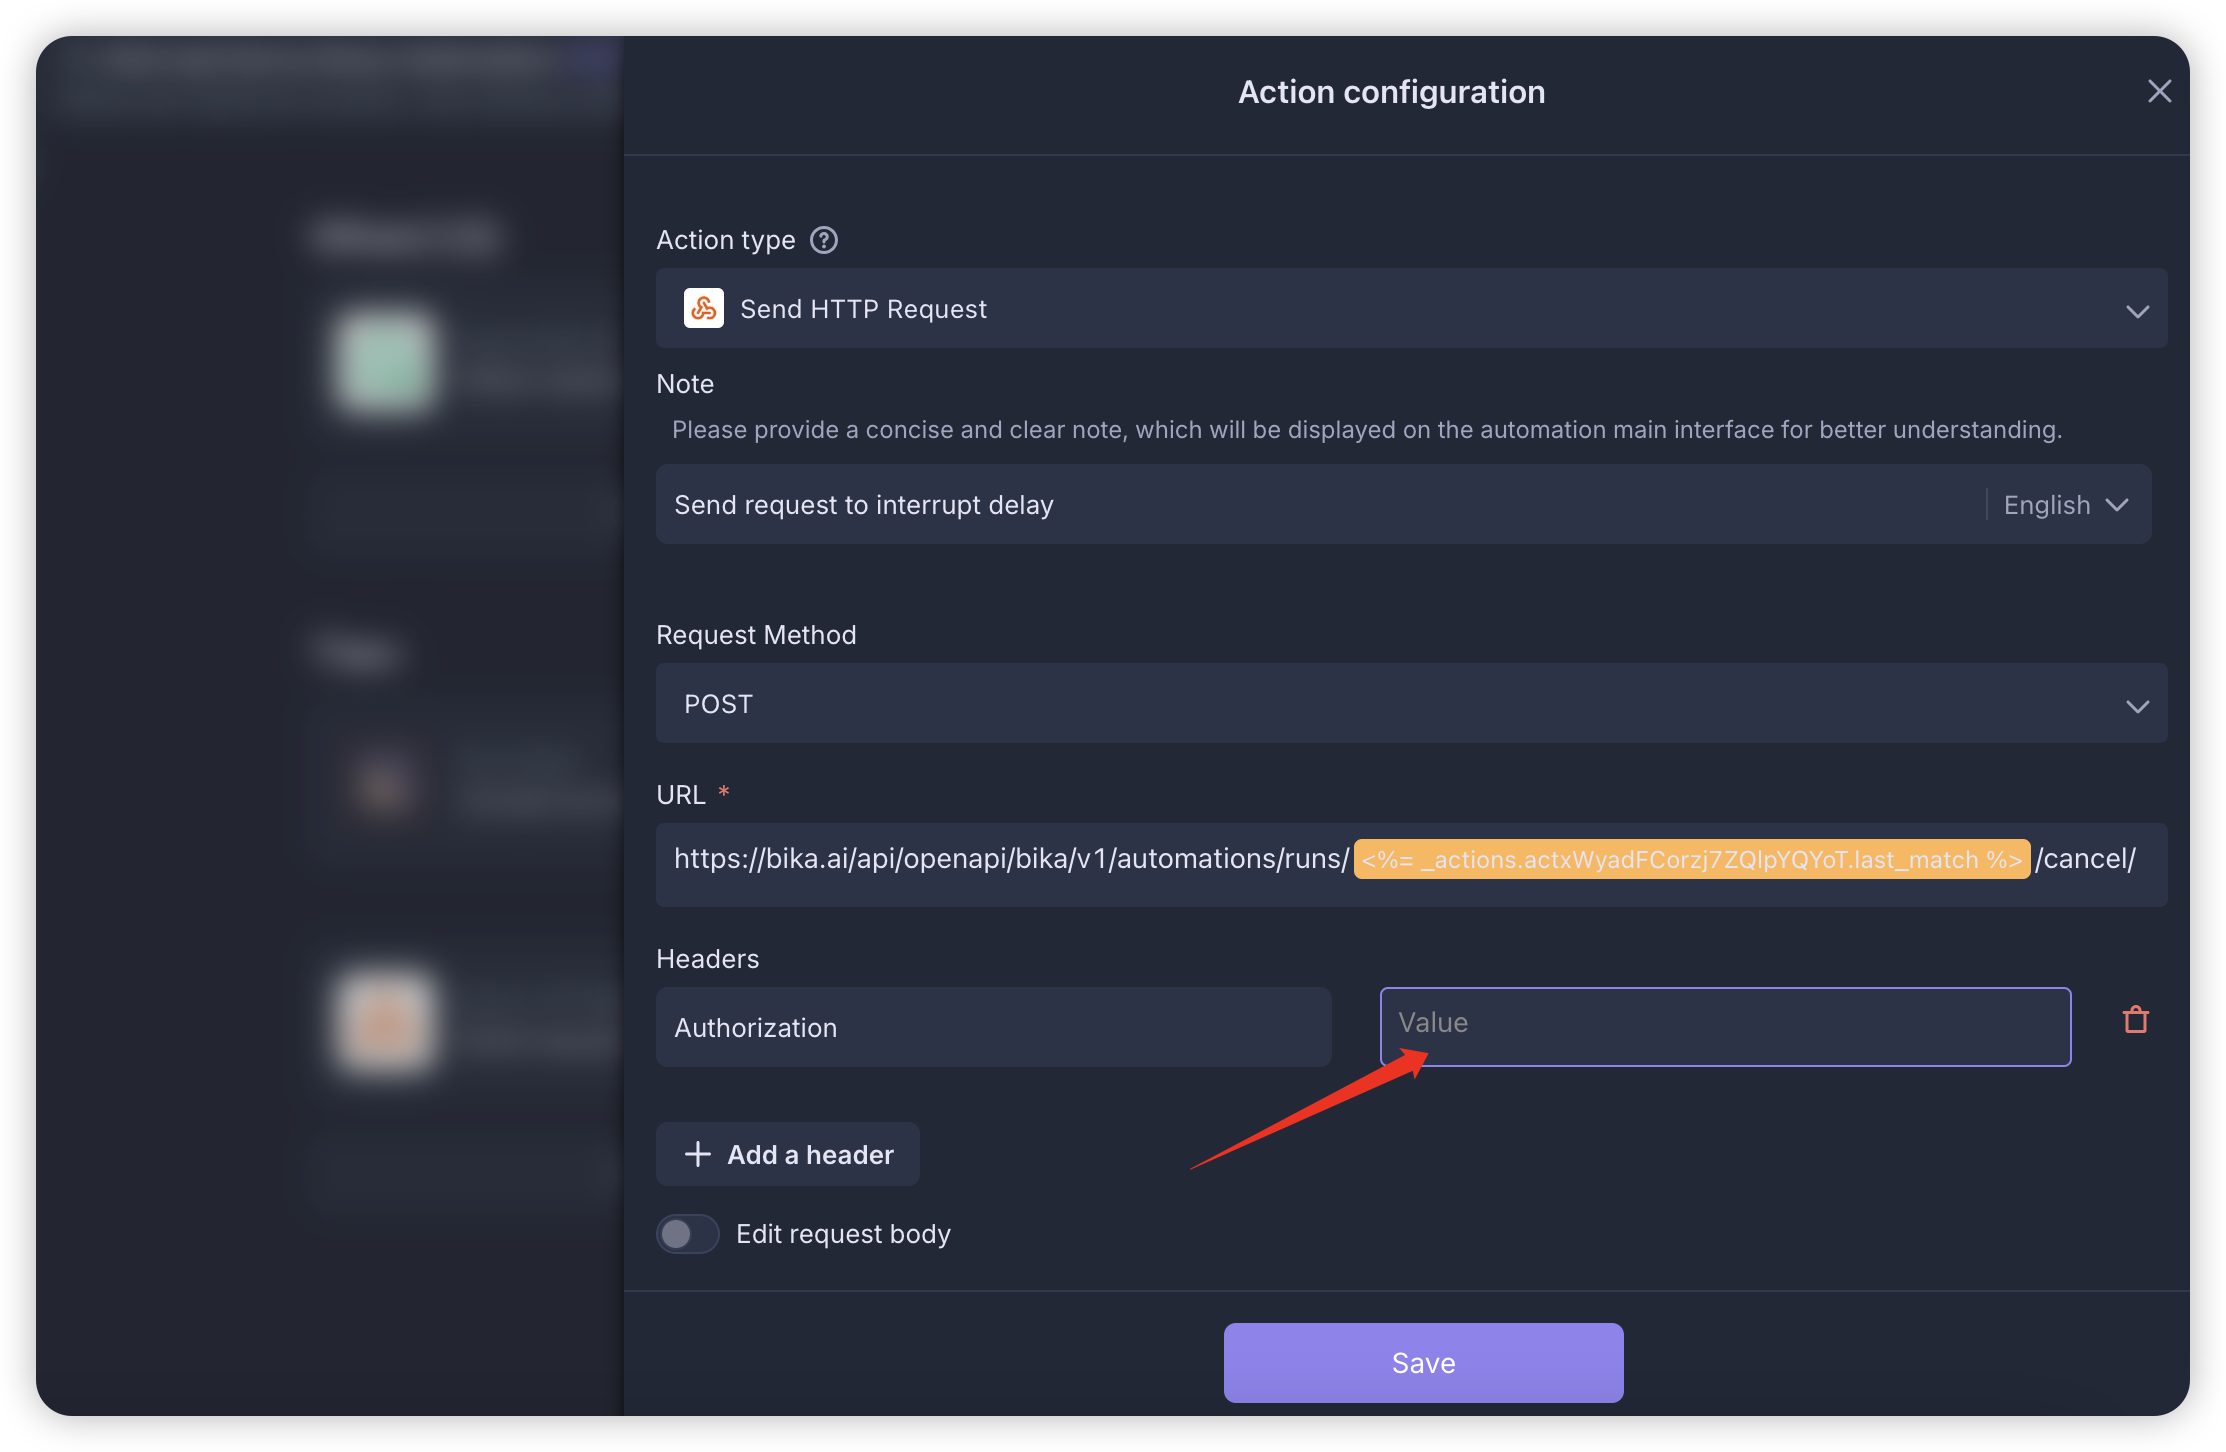
4. Configure "Interrupt Delay Series Automation"
-
Configure Email IMAP trigger: Enter the configuration page of "Interrupt Delay Series Automation." If your space already has an IMAP configuration for the email account, select the integrated email account; if not, click "Create Integration." For details, please refer to the User Manual.

-
Run Script action: This part uses a script to extract the run ID variable from the email body. No modifications are required.
-
Send HTTP Request This part interrupts the automation by calling the API interface to cancel the automation run. After installation, fill in your API Token at the location shown in the screenshot.
5. Enable Automation
After confirming that the automation configuration is correct, click the "Enable" button for both "Email Series Automation" and "Interrupt Delay Series Automation."

6. Add New Users
Enter the "New Users" database, add a test email address, and change the status field to "Confirmed to Send Email."

7. Completion
Your test email should receive the email, indicating that the "Email Series Automation" process has been successfully executed. You can modify the email content or continue to add user information as needed. Before formal use, make sure that all email titles and content have been correctly configured. After your test email receives the email, reply to it at will to see if the "Interrupt Delay Series Automation" runs successfully. If it runs successfully, the "Email Series Automation" run history will change to "Canceled," indicating that both automations have run successfully.
👉 Who Should Use This Template
- SaaS Product Managers: Looking to improve new user activation and retention rates.
- Marketing Personnel: Increase user engagement through precise email marketing.
- Customer Success Teams: Guide new users through initial setup and provide necessary support.
- Startup Founders: Ensure new users quickly get started with the core features of the product.
- Product Operations Personnel: Optimize the initial user experience using automated processes.
⭐ Key Features of This Template
- Automated Process: One-click activation, automatically sends email Seriess, saving time and effort.
- Personalized Content: Send customized emails based on user needs, enhancing interaction effects.
- Improve User Activation Rates: Systematic guidance process significantly improves user product activation and retention rates.
FAQ
Q1: How is the email Series sent?
A1: When the new user's status is updated to "Confirm Send Email," the automation process immediately sends the first email, and in the next 2 days, one follow-up email is sent each day to help users familiarize themselves with and use the product.
Q2: How to modify the email content?
A2: In the automation node, you can click each email sending step in Series to easily modify the email titles and content to better meet user needs and brand image.